Getting Started with QuikForms
This guide covers installing QuikForms in your Salesforce org and building your first form.
Overview
QuikForms builds public-facing forms that write straight into Salesforce. You lay a form out by dragging fields onto a canvas, style it to match your brand, translate it, and publish it to a URL you can link to or embed. Every version is kept, so you can publish a change and roll it back if it does not work out.
What You'll Learn
- How to install QuikForms in your Salesforce org
- Using the Setup Assistant to create a site, grant access, and connect bot protection
- Creating your first form with fields and styling
- Publishing and accessing your form
Plans and Features
QuikForms comes in two plans. Almost everything in this guide applies to both, and where it does not, the section carries a Professional badge and a note saying what Standard does instead.
Standard includes the form builder, every field type, unlimited forms and submissions, the full version lifecycle (draft, publish, version history and rollback, and taking a form offline), styling, file uploads, bot protection, surveys, chat, multi-page forms, value messages, the Setup Assistant, both Experience Cloud and Salesforce Sites publishing, up to 5 languages per form with the visitor language picker, and QuikForms AI.
Professional adds:
- The analytics dashboard: the daily breakdown, engagement, devices, browsers, referrers, per-field detail, and AI insights. Standard still counts total views and submissions per form.
- Multi-object forms: creating a parent record and its children from one submission.
- The plugin framework, including plugin field types, Flow hooks, and Platform Events.
- Unlimited languages. Standard covers up to 5 per form.
If something in this guide is missing from your org
The builder's Professional-only tabs (Related Objects and Analytics) are hidden on Standard rather than disabled, and the QuikForms Analytics Manager tab shows an upgrade message. If a tab in this guide is not in your builder, check your plan first.
A downgrade is never destructive. A form with more than 5 languages keeps and renders all of them; only adding another is refused.
For the full comparison and current pricing, see the pricing table.
When a Subscription Ends
If your subscription ends, QuikForms stays installed and nothing is deleted: your forms, fields, translations, and submissions stay in your org. Public forms go offline and tell visitors that the form is not currently available, and QuikForms AI turns off. Every QuikForms page shows a banner saying so, and until your license expires you can still open and export everything. Renewing brings your forms and QuikForms AI back. The Refund & Cancellation Policy has the details.
Prerequisites
Before you begin, ensure you have the following:
- A Salesforce org: Developer, Sandbox, or Production, and a user with admin access. The Setup Assistant's setup tasks and org-wide settings need the Customize Application permission.
- Cloudflare Turnstile keys: optional but recommended for public forms. Get them free from the Cloudflare Turnstile dashboard. You paste them into the Setup Assistant after installing.
- Digital Experiences, if you want to publish forms on Experience Cloud (recommended). Salesforce Sites needs nothing extra.
- Deploy Metadata from Non-Certified Package Versions via Apex, selected in Setup → Apex Settings, until QuikForms completes Salesforce's security review. Saving settings and activating QuikForms AI need it.
- Platform Cache for rate limiting. QuikForms installs its own partition with no cache allocated, so allocate some of your org's cache to it (see Platform Cache Setup). Forms work without it, but rate limiting is then off.
- Messaging for In-App and Web, only if you want chat forms.
QuikForms is a managed package, so there is nothing to download, build, or deploy yourself, and no developer tooling to install.
Install the Package
Install QuikForms from the link you were given when you signed up, or from its AppExchange listing. The installer is Salesforce's own:
- Open the install link while logged in to the org you want it in. Check the org name on the confirmation screen before continuing, especially if you are signed in to more than one.
- Choose who gets access. Install for Admins Only is the safe default: you give access to other people afterwards.
- Approve third-party access for the two websites QuikForms uses:
challenges.cloudflare.com, which serves the CAPTCHA on your public forms, andwww.sfquikforms.com, which the Setup Assistant's Documentation tab loads. Decline it and forms still work, but without CAPTCHA protection. - Wait for the confirmation email. A managed package of this size usually takes a few minutes.
Then open the Setup Assistant and click Grant Me Access. The rest of the setup happens there.
To give other people access, use the QuikForms Admins permission set group, which holds the permission set below. Grant Me Access adds you to it; add anyone else under Setup → Permission Set Groups → QuikForms Admins. To give access more narrowly, assign the permission sets directly under Setup → Permission Sets:
| Permission set | Who needs it |
|---|---|
| QuikForms Admin | Anyone who builds or manages forms. This is what makes the QuikForms tabs visible, and it includes QuikForms AI: AI buttons appear for everyone who has it, directly or through the QuikForms Admins group. |
Installing into a sandbox first
If you want to try QuikForms before it reaches production, install it in a sandbox using the same link with login.salesforce.com replaced by test.salesforce.com. Forms you build there can be moved across later with the export and import tools.
Setup Assistant
The Setup Assistant walks you through the org setup QuikForms needs: it gives you access, lists the steps to create a site for your forms and to prepare the objects your forms create records on, gives that site's visitors the access your forms need, connects bot protection, and holds the org-wide settings. Where a change belongs in Salesforce Setup, the panel lists the steps with the exact values, a button that opens the right Setup page in a new tab, and a Check Again button that reads the result back. With the optional Setup Automation turned on, some of those steps also offer a Do It For Me button that makes the change for you once you confirm it. A checklist shows what is done and what is left.
Opening it
Open the QuikForms app from the App Launcher and click QuikForms Setup Assistant in the utility bar at the bottom of the window. It has three tabs: Setup Tasks, Settings, and Documentation.
The Setup Tasks tab needs the Customize Application permission. Without it the tab says you do not have permission, and the Settings tab shows the settings read-only.
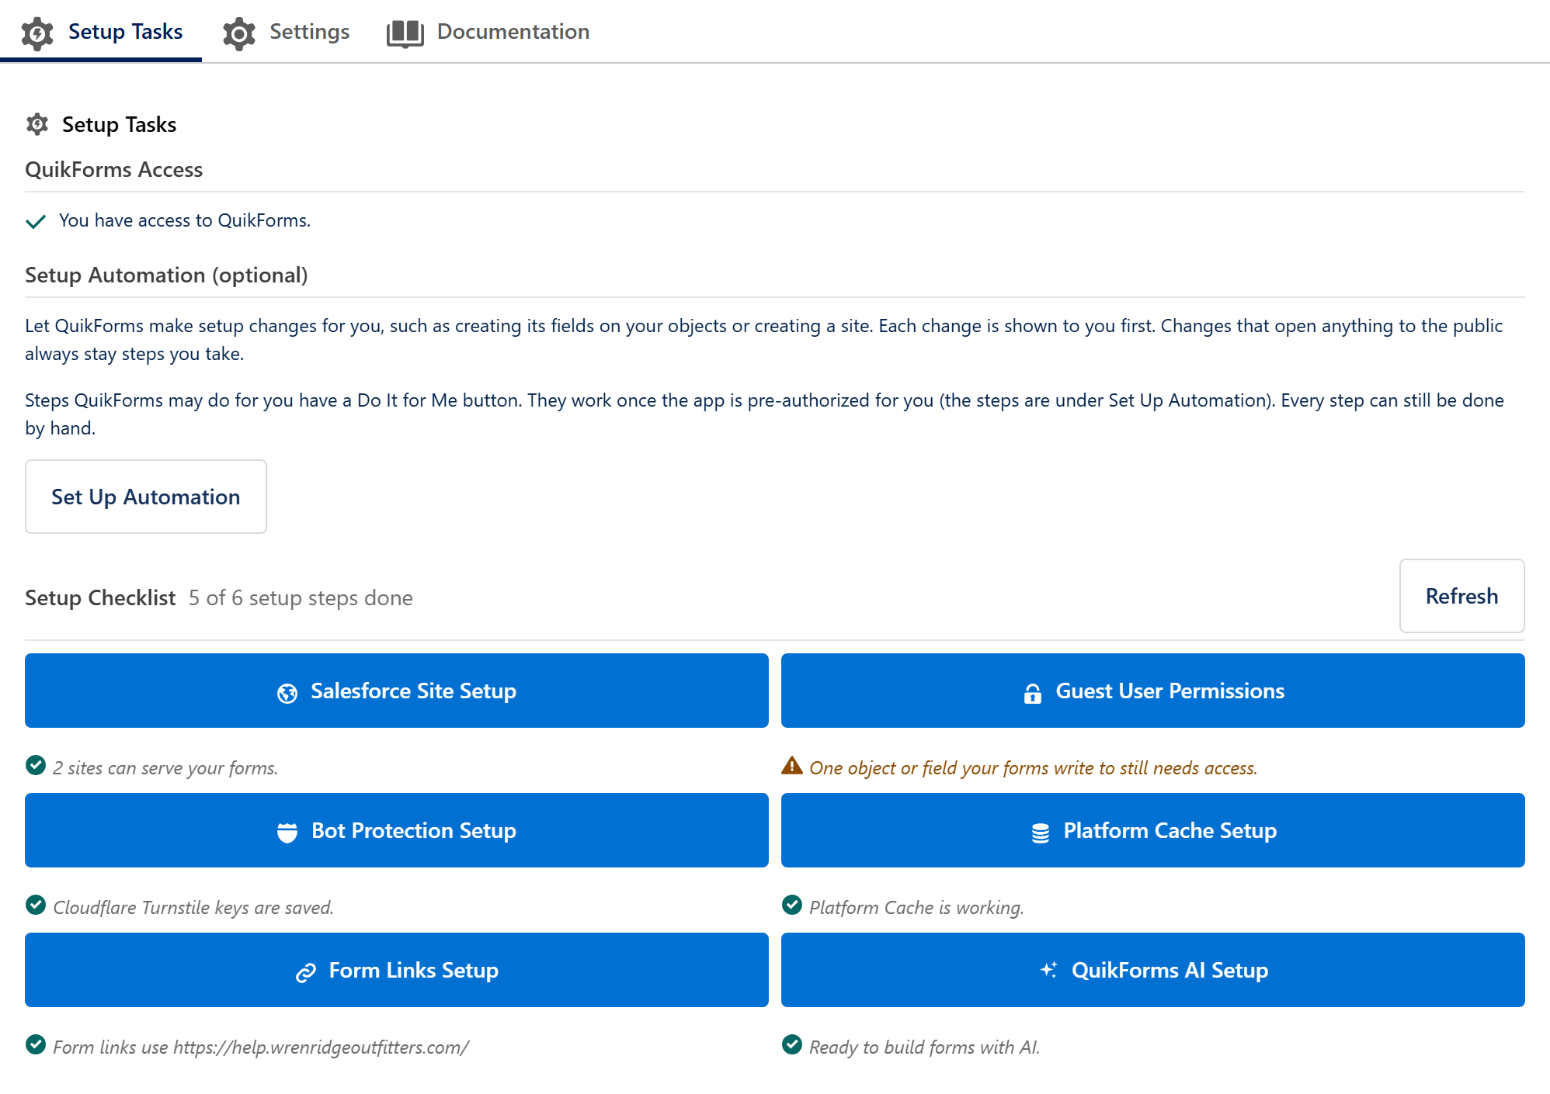
QuikForms Access: Grant Me Access
A fresh install gives QuikForms to nobody, so this comes first. Click Grant Me Access. It adds you to the QuikForms Admins permission set group, which holds the QuikForms Admin permission set. It gives access to the QuikForms app, its pages, and its AI features, and nothing outside QuikForms. Once you have access, the section reads You have access to QuikForms.
Every plan includes QuikForms AI. Turn it on next with Activate AI in QuikForms AI Setup; see How AI Is Connected.
Setup Automation (optional)
Setup Automation lets QuikForms make some setup changes for you: creating its fields on an object, creating an Experience Cloud site or a Salesforce Site, and publishing an Experience Cloud site. It is off until you turn it on, and every step can still be done by hand.
It acts as you, through the QuikForms Setup app installed with QuikForms, so each change appears in Setup Audit Trail under your name and each sign-in appears in Login History under the app's name. Before any change, a confirmation says exactly what QuikForms will do, and nothing happens until you click its button. It never changes anything that opens your org to the public, such as making a site public or changing guest access settings: those always stay steps you take.
To turn it on:
- On the Setup Tasks tab, under Setup Automation (optional), click Set Up Automation, then Open External Client App Manager, and click QuikForms Setup. It opens on the Settings tab, whose OAuth settings belong to the app: leave them as they are, and do not click Disable OAuth.
- Open the Policies tab and click Edit. Set Permitted Users to Admin approved users are pre-authorized, select the profiles or permission sets of the admins who may use it, such as System Administrator, and click Save. Choose a permission set your org created, because Salesforce does not let an org change one that came with an app.
- Come back to the panel and click Check Again. The section reads Active once QuikForms can sign in as you.
Once it is active, these steps have a Do It For Me button:
| Step | What QuikForms does |
|---|---|
| Form Objects: Add Object and Add Missing Fields | Creates the missing QuikForms fields on the object. If the object has no Submission Reference field, the confirmation also offers Also create Submission Reference, unticked, for forms that show a reference number. |
| Salesforce Site Setup: Create a new Salesforce Site | Creates an inactive site with the name and URL path you enter, with the QuikForms form page as its home page, and grants its visitors access to QuikForms and to the objects and fields your forms use. You activate the site in Setup when you are ready. |
| Salesforce Site Setup: Create a new Experience Cloud site | Creates a Build Your Own (LWR) site with the name and URL path you enter, puts the QuikForms Renderer on its Home page, and grants its visitors access to QuikForms. You then make the site public and trust the CAPTCHA script in Experience Builder, as the panel's steps describe. |
| Your Experience Cloud sites: Publish | Publishes the site. Publishing also makes live any changes made in Experience Builder that are not published yet. |
A new site's name starts as QuikForms and its URL path starts blank, which puts the site at the root of its domain. Change either before you click the button; if the root is already taken, the panel asks for a path.
Setup Checklist
Each button opens one setup task, and the line under it shows that task's live status. The header counts the required steps done, for example 3 of 5 setup steps done; click Refresh after changing something outside the assistant.
Salesforce Site Setup
Forms are served from a site in your org. This panel has three tabs:
- Experience Cloud Site (recommended; no API calls, uploads up to 2 GB). Create a new Experience Cloud site lists the steps to create a Build Your Own (LWR) site in Setup, with an Open All Sites button: create the site, add the QuikForms Renderer to its Home page, open it to the public, trust Cloudflare for CAPTCHA, and publish it. Then click Check Again, and grant the site access in Guest User Permissions. Publish Your Forms has the same steps. Your Experience Cloud sites lists the sites you have, with an Open All Sites link: publish a site in Experience Builder again after every QuikForms upgrade, or visitors keep the old version.
- Salesforce Site. Create a new Salesforce Site lists the steps to create the site in Setup, with an Open Sites button and the form page to use as its home page. Then click Check Again, and grant the site access in Guest User Permissions.
- Add to Existing Site. This tab gives step-by-step instructions for a Salesforce Site or an Experience Cloud site you already run, with an Open Guest User Permissions button for the access step.
Each Salesforce edition limits how many sites an org can have. If Salesforce reports that there is no room for another, add QuikForms to a site you already run. Publish Your Forms covers both site types step by step.
Guest User Permissions
People who fill in your forms visit your site as its guest user. The panel lists your org's sites with their type and QuikForms access: Granted, Partly granted, or Not granted. Click Grant access next to each site that serves your forms. That assigns the QuikForms Guest permission set, which covers loading and submitting forms, the form page and the CAPTCHA page, CAPTCHA verification, and linking uploaded files to the record a submission creates. It gives no access to any of your existing records.
Under Your objects and fields, QuikForms checks what your published and draft forms write to (Preview submits a draft as the site visitor, so it needs the same access). When something is missing, click Review access to see the objects the guest user must create records of and the fields it must fill, then Grant this access. It is added to the QuikForms Guest Form Access permission set, which Grant access assigns to each site. Nothing is ever removed from it, so you can also add to it yourself. Come back whenever a form starts writing to something new, before you preview or publish it.
Bot Protection Setup
QuikForms uses Cloudflare Turnstile, which is free, to stop bots submitting your forms.
- In the Cloudflare Turnstile dashboard, create a widget and add your site's domain to its hostnames.
- Paste its Site key and Secret key into the panel and click Save. The secret key is stored encrypted in Salesforce and never shown again.
- Saving a secret key also tests it with Cloudflare. The Setup Status list shows Site key saved, Secret key stored, and Cloudflare accepted the secret key. Test secret key repeats the check at any time.
To try forms before you have keys, click Use Cloudflare test keys. Forms work, but every visitor passes, so they block no bots; the panel warns you until you replace them with your real keys.
Honeypot detection works alongside Turnstile and is on by default. Both are described with the other security settings under Org-Wide Settings.
Platform Cache Setup
QuikForms uses Platform Cache for two things:
- Rate limiting, on Experience Cloud and Salesforce Sites forms alike
- Scheduling the clean-up of abandoned upload chunks on Salesforce Sites forms
File and signature uploads do not need it. They fall back to the cache only if your org has no signing key, and Grant this access in Guest User Permissions creates that key.
The QuikFormsCache partition is installed with QuikForms but starts with no cache allocated to it. The panel checks whether the cache works. If it does not:
- Click Open Setup.
- Open the QuikFormsCache partition. There is nothing to create.
- Click Edit and allocate 1 MB of Org Cache. Session Cache can stay at 0.
- Click Save, then return to the panel and click Check again. It should say Platform Cache is working.
Without it
Rate limiting is off on both kinds of site, and abandoned upload chunks are cleaned up less often. Forms, file and signature uploads, and draft previews keep working.
Form Links Setup
This task opens the Settings tab at Public Site URL: the address that opens a form when ?fc= and a form ID are added. Survey links and the builder's Preview are built from it. Under the field, Your sites lists each site with the right address; click Use next to the one that serves your forms. A site whose visitors have no QuikForms access yet is marked, so grant it in Guest User Permissions first.
QuikForms AI Setup
This task connects QuikForms AI, either through the AI included in your plan or with your own Anthropic key. See QuikForms AI Setup.
Form Objects
A form can only create records on an object that has been prepared for QuikForms. On a new install no object is prepared, so do this before building your first form.
Preparing an object means adding five fields to it in Object Manager. The panel lists the steps with the exact values, or, with Setup Automation on, Do It For Me creates them for you.
- Under Form Objects on the Setup Tasks tab, click Add Object.
- In Add a Form Object, choose the object, for example Case or Lead. Objects that already have all five fields are not listed. Choose another object goes back to the list.
- Click Open Object Manager. It opens the object's Fields & Relationships in a new tab.
- For each of the five fields below, click New and create it with the Data Type, Field Label, and Length shown. Salesforce fills in the Field Name from the label; keep the rest of the defaults.
- On the field-level security step, keep the field visible to your own profile. Site visitors get their access from Guest User Permissions, not from that step.
- Come back to the panel and click Check Again. It says which fields are still missing, or that all five are there, and then makes them visible to you. Click Close when you are done.
Each prepared object is listed with its state:
| State | Meaning |
|---|---|
| Ready | Forms can create records on it. |
| N of 5 fields | Some of the five fields are missing, and the row names them. Click Add Missing Fields for the same steps, listing only the missing fields. |
| Hidden from you | The fields exist but you cannot see them, so the builder's Form Object picker does not offer the object. Click Show Fields to Me. |
These are the five fields (the same values are in the panel's steps):
- Quik Form Config: Text, Length 255. It records the form that created the record. Forms can only choose an object that has it.
- Quik Extra Fields: Text Area (Long), Length 131072, Visible Lines 3. It holds answers that have no field of their own on the object, as readable text.
- Quik Extra Fields JSON: Text Area (Long), Length 131072, Visible Lines 3. It holds the same answers as JSON, for flows and integrations.
- Quik User IP: Text, Length 45. It holds the visitor's IP address when the form logs browser information.
- Quik Browser User Agent: Text Area (Long), Length 1024, Visible Lines 3. It holds the visitor's browser when the form logs browser information.
A sixth field, Submission Reference, is optional. It holds the reference number a form can show its visitors (see Show Reference Number on the Settings tab). With Setup Automation on, Do It For Me offers to create it with the other fields when the object does not have it.
Survey forms need no preparation: they write to QuikForms' own Survey object.
Large File Uploads
A file field with Enable 2GB Uploads takes files up to 2 GB on an Experience Cloud site, using Salesforce's own upload control. A visitor who is not logged in can use that control only once the site allows it, and a new site does not. Until it does, the field shows the standard upload, up to 4 MB a file, so the form keeps working.
When any field uses 2 GB uploads, the Setup Tasks tab shows a Large File Uploads list with each Experience Cloud site:
| State | Meaning |
|---|---|
| Ready | Visitors can upload files up to 2 GB on this site. |
| Standard upload only | The row names the settings that are off. Click Show Me How. |
2 GB uploads need three Salesforce settings, which you turn on yourself in Setup. Show Me How lists the steps:
- Only if the org setting is off: in Setup, enter Salesforce Files in Quick Find, open General Settings and click Edit. Select Allow site guest users to upload files and save. It is a setting for your whole org; it lets visitors upload files without seeing any.
- Click Open All Sites and click Workspaces next to the site.
- Open Administration, then Preferences. Select Let guest users view asset files, library files, and CMS content and Allow guest users to access public APIs, and save. The first lets visitors see files you have published to the site, such as its images; files attached to your records stay private. The upload control talks to Salesforce through the site's API, so the second has to be on. Read the warning below first.
- Come back to the panel and click Check Again. Both preferences take effect without publishing the site.
What "Allow guest users to access public APIs" opens. With it on, anyone who is not logged in can call the site's Salesforce APIs as the site's guest user. They can do only what that user is allowed, and today that includes creating records on the objects your forms write to, so a visitor could create such a record without the form, its CAPTCHA, or its checks. They still cannot read your records unless you share them with guests, and QuikForms never does. Turn it on only if you need uploads over 4 MB. If you do not, leave it off: the file fields use the standard upload, up to 4 MB a file on Experience Cloud.
To undo it, turn the two preferences off on the same Preferences page in the site's Workspaces. The file fields then go back to the standard upload. The builder warns on a 2 GB field, in the field editor and on the canvas, while a site is not set up.
Org-Wide Settings
The Settings tab holds the settings that apply to every form in the org, in four sections. The same panel opens from the Settings button in QuikForms Manager for users with Customize Application.
| Section | Settings |
|---|---|
| Public Forms | Public Site URL (see Form Links Setup), Default Form Object (preselected for new forms), and Default Survey Validity (days), which individual forms can override. |
| Security | Turnstile Site Key; Honeypot Bot Detection, a hidden field that bots fill in and people never see (on by default, checked in the browser and on the server); Rate Limit (per minute), the form submissions, survey submissions, and plugin callouts allowed per minute from one IP address, on Experience Cloud and Salesforce Sites forms alike (default 20; page views and file uploads do not count, visitors behind one office network share the limit, and it needs Platform Cache); Valid Referrers, a comma-separated list of the domains your form pages are served from, such as your site's own domain or custom domain. A request from a page on any other domain is refused (blank allows any, and a wrong entry blocks legitimate submissions). It does not control which websites may embed your forms; see Embedding Forms. |
| Features | AI Features Enabled turns every QuikForms AI feature off or on for the whole org (on by default). Analytics Enabled tracks form views and submissions. |
| Data & Logging | Exception Log Level (the default, Error, logs Critical and High; Warning adds Medium, Info adds Info, Debug logs everything, None turns logging off), Exception Log Retention (days) (default 30), Analytics Retention (days) (default 365), and AI Chat Retention (days) (default 90). |
Changes collect until you click Save; Discard drops them and Reload reads the stored values again. Salesforce saves settings in the background, so the panel says Saved only after it has read the new values back.
If a save or AI activation does not finish
Saving settings and activating QuikForms AI deploy metadata from Apex. Until QuikForms completes Salesforce's security review, Salesforce allows that only when Setup → Apex Settings → Deploy Metadata from Non-Certified Package Versions via Apex is selected. The panel names this setting when it is the likely cause.
Documentation Tab
This tab shows the QuikForms documentation inside Salesforce.
Publish Your Forms
A QuikForms form is served from your own Salesforce org, so you need somewhere public for it to live. There are two options, and the one you pick changes nothing about how you build forms: the same form works on either.
| Experience Cloud | Salesforce Sites | |
|---|---|---|
| API calls per completed form | None. Nothing is metered. | About 3 against your org's daily allocation (2 with analytics off) |
| File uploads | Up to 4 MB per file with the standard control; up to 2 GB for a file field with Enable 2GB Uploads turned on, once the site is set up for it (Large File Uploads) | Up to 9 MB per file |
| Embedding in your website | Yes. In Experience Builder, allow framing by your website under Settings → Security & Privacy, then publish | Yes. Set the site's Clickjack Protection Level in Setup and add your website |
| Chat forms (Messaging for In-App and Web) | Yes. Add one line to the site's head markup and set its security level to Relaxed CSP (see Chat on Experience Cloud) | Yes |
| Setup | A site, created and published in Setup with the Setup Assistant's steps, and the QuikForms Renderer on a page | A site, created in Setup with the Setup Assistant's steps |
| Needs | Digital Experiences enabled in your org | Nothing extra |
Experience Cloud is the recommended option
Apex REST calls count against your org's daily API allocation, and the Salesforce Sites path uses about three of them per completed form, shared with every other integration in the org. The Experience Cloud renderer uses none.
Salesforce Sites is the option to use if Digital Experiences is not enabled in your org, or if you already serve other pages that way and want the form alongside them.
What you are building is an Experience Cloud site that serves your forms with no API cost and supports large file uploads.
-
Enable Digital Experiences
In Setup, search for Digital Experiences and open Settings. Tick Enable Digital Experiences and choose a domain name. This is a one-time org setting; skip it if experiences are already on.
-
Open the steps in the Setup Assistant
In the Setup Assistant, click Salesforce Site Setup; the panel opens on the Experience Cloud Site tab. Create a new Experience Cloud site lists the steps below with the exact values, an Open All Sites button that opens Setup in a new tab, and a Check Again button that finds the site once you have created and published it. For a site you already run, the panel's Add to Existing Site tab lists the steps. With Setup Automation on, Do It For Me creates the site, puts the QuikForms Renderer on its Home page, and grants its visitors access; you still make it public, trust the CAPTCHA script, and publish it.
-
Create or choose the site
Use an LWR site you already run, or create one: click Open All Sites (in Setup, Digital Experiences → All Sites) and click New. If there is no New button, turn on Digital Experiences first (the step above). Choose the Build Your Own (LWR) template and click Get Started, give the site a name and, if you like, a URL path, and click Create. Any site name and URL work.
It must be an LWR template. The QuikForms renderer is a Lightning Web Component and will not load on an Aura-based template such as Customer Service or Partner Central.
-
Add the form page
Open the site in Builder and pick the page that will show forms: a new page on a site you already run, or the home page of a new site. Drag the QuikForms Renderer component onto it. Leave its Form ID blank: the component reads
?fc=from the URL, so one page serves every form you build.On a site of its own, set the theme layout to QuikForms Theme (No Chrome) in the Theme panel. It is a blank canvas with no header, footer, or navigation, so the form is the whole page. On a site you already run you can keep your own theme; the form renders inside it.
In Builder, open Settings. Under General, select Public can access the site. If your forms use CAPTCHA, add
https://challenges.cloudflare.comas a trusted site for scripts under Security & Privacy. To show forms in an iframe on your own website, allow it in the same section; see Embedding Forms. -
Give the guest user access
In the Setup Assistant, click Guest User Permissions. Your site is listed there; click Grant access next to it. That assigns the QuikForms Guest permission set, which covers loading and submitting forms, the CAPTCHA page, CAPTCHA verification, and linking uploaded files to the record they belong to. It gives no access to your existing records.
Your forms also need to create records of whatever they write to, such as Case or Lead, and to fill the fields they use. In the same panel, under Your objects and fields, click Review access to see exactly what your published and draft forms need, then Grant this access. QuikForms adds it to a permission set it creates, QuikForms Guest Form Access, which Grant access assigns to each site. It never removes anything. Come back whenever a form starts writing to something new, before you preview or publish it.
-
Publish
Click Publish in Experience Builder, then click Check Again in the Setup Assistant. Your form is now live on that page, with the form's ID added:
https://[your-site-address]/[form-page]?fc=contact-us
-
Tell QuikForms where forms live
In the Setup Assistant, click Form Links Setup. It opens the Settings tab at Public Site URL: set it to the address of that page, without
?fc=, or click Use next to your site under Your sites. Click Save. Survey links and the builder's Preview are built from it.
Publish again after every QuikForms upgrade
An Experience Cloud site serves a compiled copy of your components made when it was last published. Installing a new QuikForms version updates the org but not that copy, so the site keeps serving the old one. Experience Builder shows the current components, so it can look correct while the public address does not.
If a fix you just installed is not visible on the public address, publish the site before investigating anything else: in Setup, open All Sites, click Builder next to the site, then click Publish. The Setup Assistant's Your Experience Cloud sites box has an Open All Sites link.
What you are building is a classic Salesforce Site that serves the Visualforce form page.
-
Create the site
In the Setup Assistant, click Salesforce Site Setup and open the Salesforce Site tab. Create a new Salesforce Site lists these steps with the exact values. With Setup Automation on, Do It For Me creates the site for you, inactive, with the form page as its home page, and grants its visitors access; you then activate it in Setup.
- Click Open Sites to open Sites in Setup. If Salesforce asks you to register a Sites domain first, do that; it is one address for all your Salesforce Sites.
- Click New. Enter any Site Label, for example
QuikForms. Leave Default Web Address blank to put the site at the root of your Sites domain, or enter a path such asformsif another site is already there. Set Active Site Home Page toquikforms__qf, so the site address itself shows forms, and select Active. - Optional, to show forms in an iframe on your own website: set Clickjack Protection Level to allow framing by the same origin and the domains you list, and add your website. Leave it as it is if forms are only opened by link.
- Save, come back to the panel, and click Check Again.
- Open Guest User Permissions, click Grant access next to the site, and grant what your forms write to under Your objects and fields, as described in the next step.
Each Salesforce edition limits how many sites an org can have. If Salesforce reports that the org has no room for another, add QuikForms to a site you already run instead.
-
Or use a site you already run
Any Salesforce Site works, under any name and URL path prefix. The panel's Add to Existing Site tab lists these steps, with an Open Guest User Permissions button. In Guest User Permissions, your site is listed; click Grant access next to it. That assigns the QuikForms Guest permission set, which covers the form page, the form service, and CAPTCHA verification. It gives no access to your existing records.
Your forms also need to create records of whatever they write to, such as Case or Lead, and to fill the fields they use. In the same panel, under Your objects and fields, click Review access to see exactly what your published and draft forms need, then Grant this access. QuikForms adds it to a permission set it creates, QuikForms Guest Form Access, which Grant access assigns to each site. It never removes anything. Come back whenever a form starts writing to something new, before you preview or publish it.
Optionally, in Setup → Sites, set the site's Active Site Home Page to
quikforms__qf, so the site address itself opens forms. To show forms in an iframe on your own website, open the site there, set Clickjack Protection Level to allow framing of site pages on external domains, and add your website to the list. -
Test it
Your form is live at:
https://[your-domain].my.salesforce-sites.com/[path]/quikforms__qf?fc=contact-us
If
qfis the site's home page,https://[your-domain].my.salesforce-sites.com/[path]/?fc=contact-usworks too. -
Tell QuikForms where forms live
In the Setup Assistant, click Form Links Setup. It opens the Settings tab at Public Site URL, the address that shows a form when
?fc=is added. It is used exactly as entered. Ifqfis the site's home page, that is the site address, for examplehttps://acme.my.salesforce-sites.com/forms/, and your links carry no page name; otherwise add the form page, for examplehttps://acme.my.salesforce-sites.com/forms/quikforms__qf. Under Your sites, click Use next to your site and QuikForms fills in the right one. Click Save. Survey links and the builder's Preview are built from it.
This path costs API calls
The form talks to Salesforce over the Apex REST API, which counts against your org's daily allocation at about three calls per completed form (two with analytics off). That allocation is shared with every other integration you run. The Experience Cloud path uses none.
Quick Start: Create Your First Form
With QuikForms installed, the next steps build a working contact form that creates a Case: create the fields, assemble them into a form, then publish it.
Before you start: prepare the Case object
A form can only create records on an object prepared for QuikForms, and a new install has none. In the Setup Assistant, under Form Objects, click Add Object and choose Case. Follow the steps the panel shows to create the five QuikForms fields on Case in Object Manager, then click Check Again until Case shows Ready. See Form Objects.
Step 1: Create Fields
Fields live in a shared library, so a field you create once can be used on any form.
- Open the QuikField Manager tab
- Click New. The field editor opens
- Under Quick Start Templates, click Email Field. It fills in the field for you. Check the values against the table below, then click Save
- Repeat for the other fields. Subject Field and Message Field are templates too; the name field has no template, so fill it in by hand
| Field Name | Field ID | Field Type | Object Field (Field Mapping tab) | Required Field (Validation & Behavior tab) |
|---|---|---|---|---|
| Full Name | contact_name |
Text Input | Web Name (SuppliedName) | On |
| Email Address | email_address |
Text Input | Web Email (SuppliedEmail) | On |
| Subject | subject |
Text Input | Subject (Subject) | On |
| Message | message |
Text Area | Description (Description) | On |
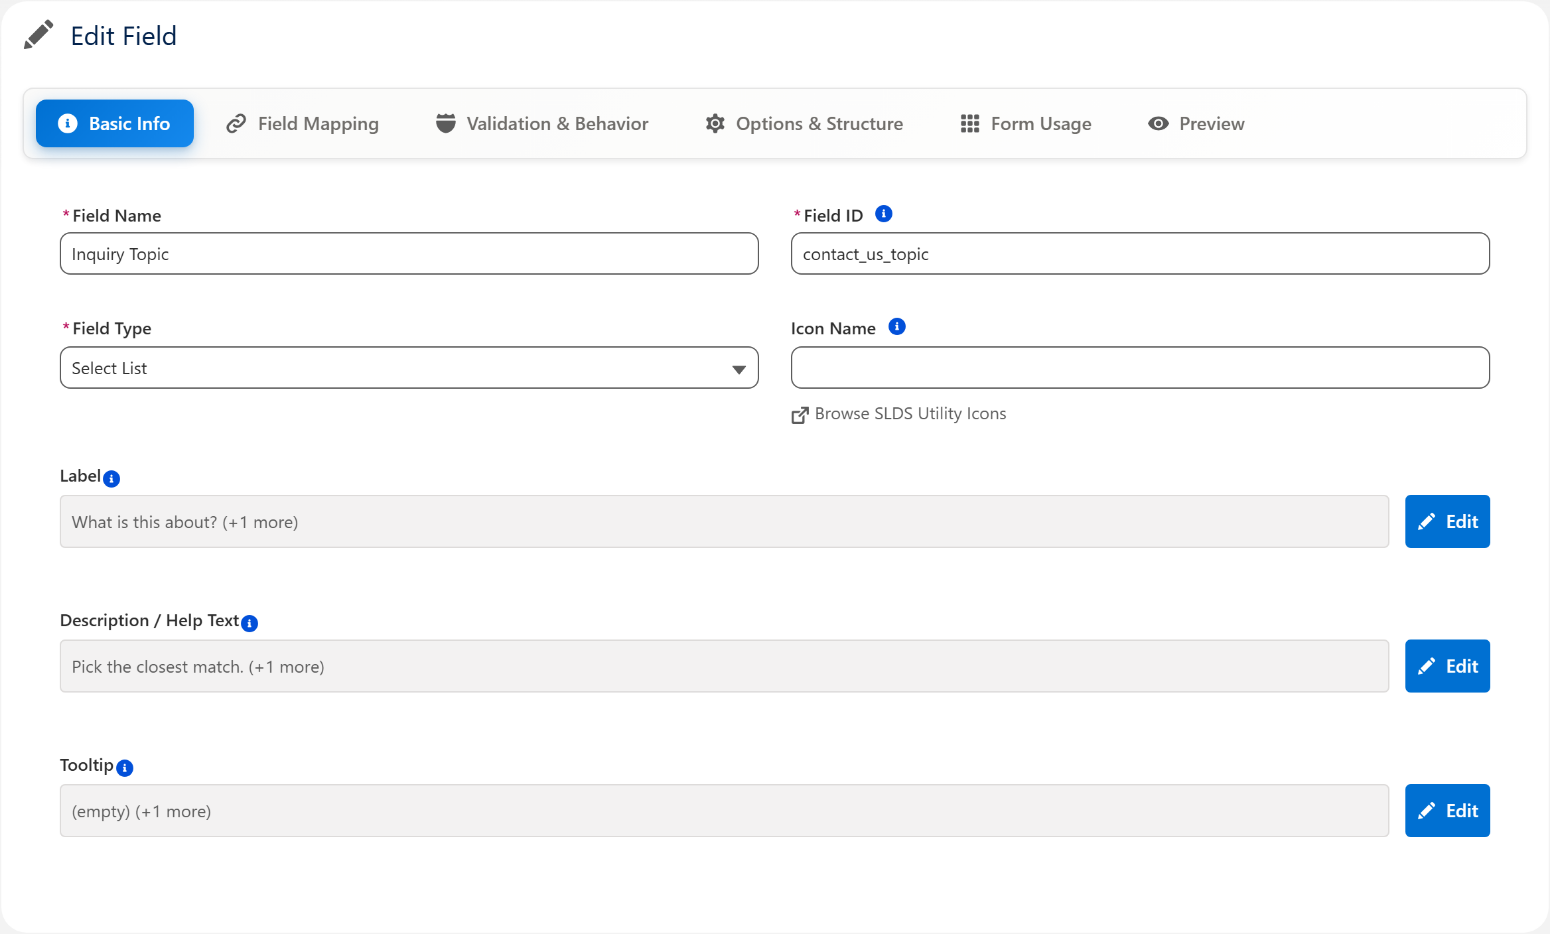
The Label on the Basic Info tab is what visitors read above the field; set it to the same text as the Field Name. On the Field Mapping tab, the Target Object starts as Case, and the Object Field list shows each field's label with its API name in brackets. The Email Field template also sets a Validation Regex on the Validation & Behavior tab, so visitors must enter a valid email address.
Step 2: Create Form
There is no form to fill in first. Clicking New creates the form and takes you straight into the builder, where you name it and set it up.
- Open the QuikForms Manager tab
- Click New
QuikForms creates a draft called Untitled Form, gives it an auto-generated Form ID, and opens the Form Builder on it. From there:
- Click Rename in the builder header and call it
Contact Us Form - Go to the Settings tab and, under Basic Information, set:
| Setting | Value | Why |
|---|---|---|
| Form ID (URL Parameter) | contact-us |
This is the ?fc= value in the public URL. Change it now: once the form is published, people may have the old link. |
| Form Object | Case | The Salesforce object each submission creates. Click Select Object and choose Case. Only objects prepared under Form Objects are listed. |
| Form Type | Record Creation | The default. Survey and Chat are the other two. |
Then open the Labels tab. Under Form Text Labels, set Form Title to Contact Us, the heading visitors see above the form, and optionally a Subtitle and Confirmation Message. Under Field Labels, Submit Button Label sets the text of the submit button.
Click Save Form when you are done. The rest of this guide assumes the Form ID is contact-us.
Step 3: Add Fields to Form
In the Form Builder, add your fields:
- Click the Form Editor tab
- In the Available Fields panel, find the fields you created
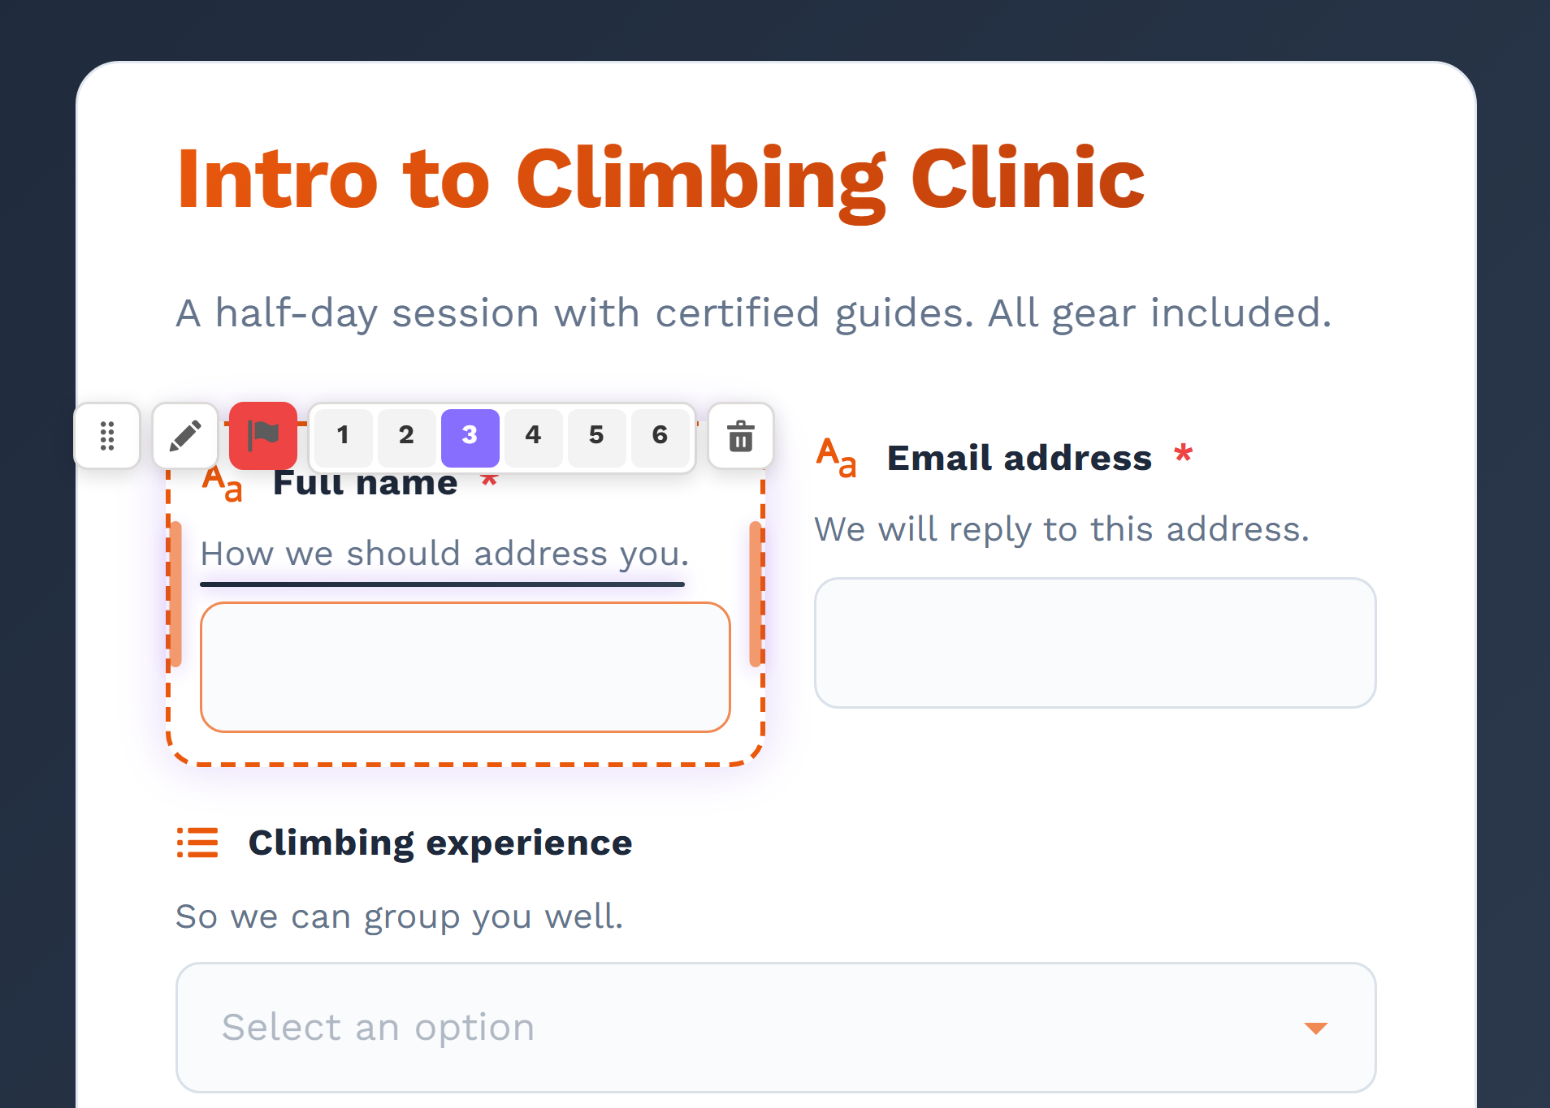
- Drag each one onto the form canvas, or into the Display Fields drawer, in this order:
- Full Name
- Email Address
- Subject
- Message
- Set column widths for the layout. The form is six columns wide; give Full Name and Email Address 3 columns each so they sit side by side
- Click Save Form
Step 4: Style the Form
Customize the form's appearance:
- Click the Styling tab
- Pick a theme under Quik Themes, or set colors yourself under Main Colors, for example:
- Background Color: #ffffff
- Button Color: #1e5ba8
- Highlight Color: #AA28B9
- Under Layout & Typography, choose a Font Family (for example, Inter)
- Click Save Form
CAPTCHA protection is on by default. It is controlled by Disable CAPTCHA under Features & Options on the Settings tab; leave it unchecked for a public form, and make sure bot protection is set up in the Setup Assistant.
Step 5: Preview & Test
Test your form before publishing:
- Click Preview in the Form Builder header. The draft opens on your public site in a new browser tab.
- Fill out and submit the form
- Check that a Case record is created in Salesforce
- Check that the confirmation message displays
Preview links
Preview opens the draft on your public site, on Experience Cloud or Salesforce Sites, with a secure link that expires after 8 hours. Submitting it creates a record from the draft, so you can test it end to end. Preview needs a Public Site URL: set it in the Setup Assistant first.
Step 6: Publish and Access the Form
When the form is ready, publish it:
- In the Form Builder, click Publish
- Under Version Type, choose Major or Minor. QuikForms works out the number for you.
- Optionally add a Version Tag, a short label like "Black Friday" or "Bug fixes"
- Click Publish
The form is now live, and the builder header shows Live.
Form URL
On Experience Cloud, the form is at the page where the QuikForms Renderer sits, with the form ID added. For a site the Setup Assistant created, that is the site's home page:
https://[your-site-address]/?fc=contact-usOn Salesforce Sites, it is:
https://[your-domain].my.salesforce-sites.com/[path]/quikforms__qf?fc=contact-usHere [your-domain] and [path] are your Salesforce Site's domain and URL path prefix. If the form page is the site's home page, the page name can be left out.
Embedding Forms
You can embed a form in your website using an iframe, on either kind of site, CAPTCHA included. By default a site refuses to be framed by another website, so allow yours first:
- Experience Cloud: in Experience Builder, open Settings → Security & Privacy and set Clickjack Protection Level to Allow framing of site pages on external domains (Good protection). Under Trusted Domains for Inline Framing, click Add Trusted Domain and enter your website's address, starting
https://. Then publish the site: visitors see the change only after publishing. - Salesforce Sites: open the site in Setup → Sites, set Clickjack Protection Level to allow framing of site pages on external domains, and add your website to the list. You can do this when you create the site.
<iframe
  src="https://[your-form-address]?fc=contact-us"
  width="100%"
  height="600"
  frameborder="0">
</iframe>
Admin Guide
This guide covers managing forms, fields, and every administrative feature in QuikForms.
Dashboard Overview
The QuikForms app has four tabs:
- QuikForms Manager: every form in the org, with its versions and publishing. The Form Builder opens from here
- QuikField Manager: the shared library of reusable form fields
- QuikForms Analytics Manager: views, submissions, conversion rates, and trends across every form Professional
- QuikForms Error Manager: exceptions logged by QuikForms, for troubleshooting
The Setup Assistant sits in the app's utility bar.
Admin Permission Required
You need the QuikForms Admins permission set group, or the QuikForms Admin permission set, to see these tabs. Grant Me Access in the Setup Assistant gives you the group.
Form Management
Forms Dashboard
The QuikForms Manager lists every form in the org. Search by name, title, or ID, and filter by Form Object and Status.
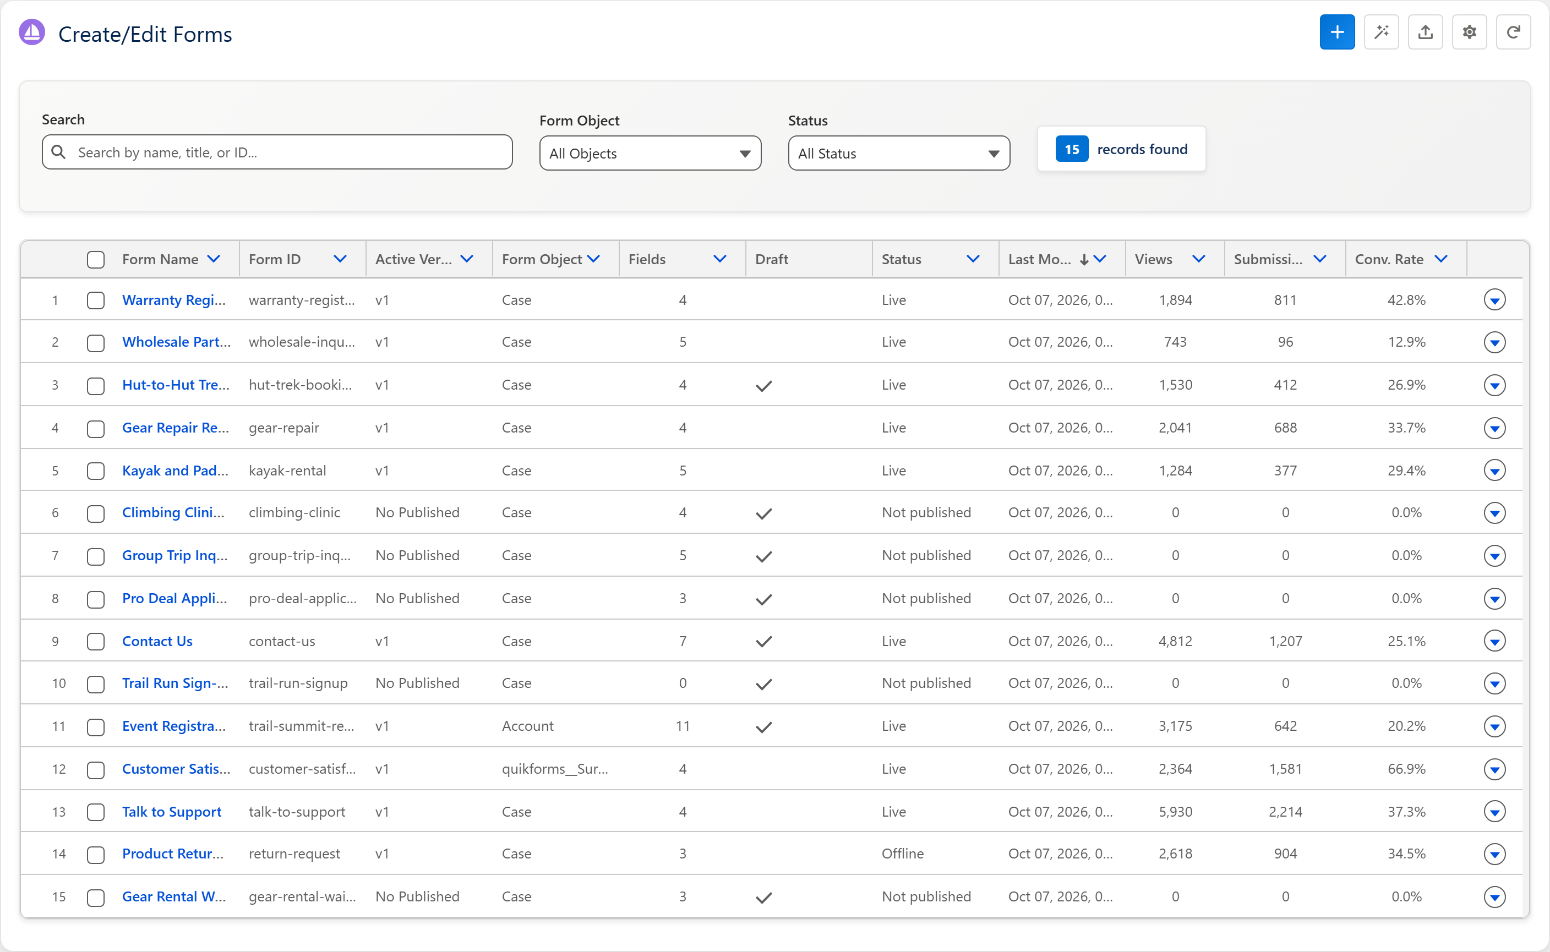
Table Columns
| Column | Description |
|---|---|
| Form Name | Display name of the form. Click it to open the builder |
| Form ID | Unique identifier used in URLs (for example, contact-us) |
| Active Version | The published version |
| Form Object | The Salesforce object where submissions are saved |
| Fields | Number of fields on the form |
| Draft | Whether an unpublished draft exists |
| Status | Live, Offline (published but taken offline), or Not published |
| Last Modified | Last update timestamp |
| Views, Submissions, Conv. Rate | Lifetime totals for the form, on every plan |
Header Actions
- New: create a form. It opens straight in the builder
- Create with AI: describe the form in plain language (What should this form do?, plus an optional Form name); QuikForms AI builds a draft and opens it in the builder. The button appears when QuikForms AI is available to you
- Import: import forms from JSON
- Settings: the org-wide settings, the same panel as the Setup Assistant's Settings tab. Users with Customize Application see it
- Export (N): export the selected forms to JSON. The button appears when rows are selected
- Refresh: reload the list
Row Actions
The menu on each row shows only the actions that apply to that form.
- Edit Draft: open the form's draft. Shown when the form has one
- Edit Published: view the published version, shown when the form has one. It is read-only; use Create Draft to change it. Field definitions can still be edited and apply live
- Create Draft: start a new draft. Shown when the form has no draft, since a form has one draft at most
- Preview: test the form with a preview token
- Take Offline or Go Live: on a published form, whichever applies. See Taking a Form Offline
- Delete: remove the form, every version, and its saved AI chats. A form that has surveys cannot be deleted, because survey responses stay linked to the form that produced them; take it offline instead
Creating Forms
To create a new form:
- Click New in QuikForms Manager. The form is created immediately, as a draft named Untitled Form with an auto-generated Form ID, and the Form Builder opens on it.
- Click Rename in the builder header to give it a real name.
- On the Settings tab, under Basic Information, set what the form is for:
- Form ID (URL Parameter): the
?fc=value in the public URL - Form Object: click Select Object. The list shows the objects prepared under Form Objects
- Form Type: Record Creation (the default), Survey, or Chat
- Form ID (URL Parameter): the
- On the Labels tab, under Form Text Labels, set the Form Title and Subtitle visitors read above the form.
- Click Save Form.
Form ID Requirements
Form IDs must be unique and can contain letters, numbers, hyphens, and underscores, with no spaces. You can change a Form ID while editing a draft, but it is part of every link to the form, so links that use the old ID stop working once you save.
Chat Forms
A Chat form collects details, then starts a Messaging for In-App and Web conversation with them. It needs a Messaging deployment for the domain of the site that shows the form. See Chat Forms for the full setup.
Form Builder Interface
The Form Builder is a tabbed interface with seven tabs: Form Editor, Settings, Labels, Styling, Related Objects, Dynamic Fields, and Analytics. Related Objects and Analytics appear on the Professional plan.
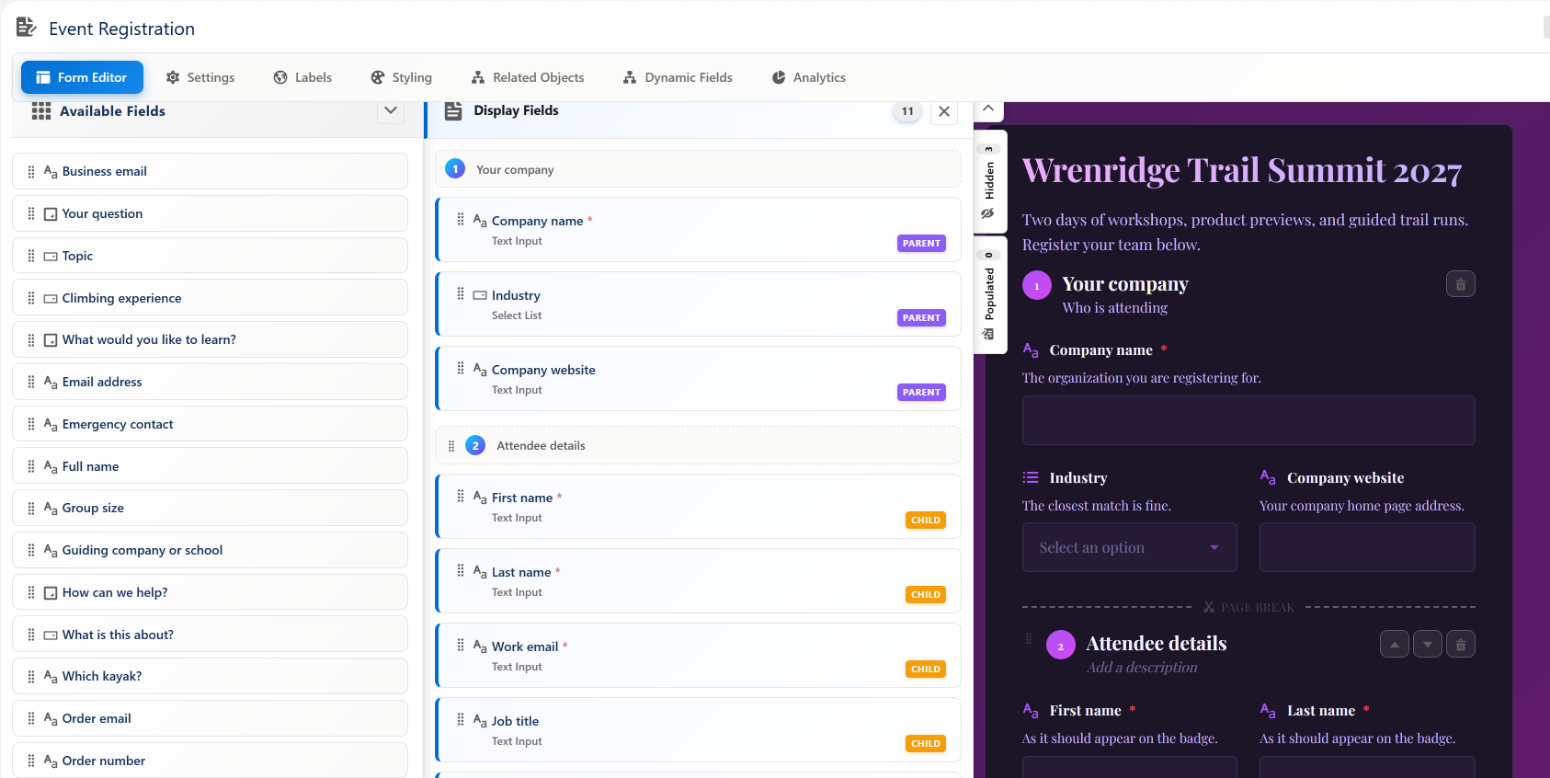
The builder header
Badges show whether the form is Live or Offline, which version you are looking at (Published or Archived), and whether it is Editable (a draft) or Read-Only. The Version picker switches between versions. The header has these buttons:
- History: the version history (see Version Control)
- Take Offline or Go Live: shown once the form has been published (see Taking a Form Offline)
- Draft: create a draft from the version you are viewing
- Publish: publish the draft
- Save Form: saves changes to the form version: layout, settings, text, styling, and rules
- Save Field Changes: saves edits to field definitions. Fields are shared, so these apply at once to every form that uses them
- Save All: appears when there are both kinds of change, and saves both
- Preview: opens the version on your public site in a new tab, as visitors see it. Needs a Public Site URL
- Rename and Delete
Nothing is saved automatically: the save buttons appear when there is something to save.
Settings Tab
The Settings tab holds what the form is and how it behaves. Its text, such as the title and button labels, is on the Labels tab.
Basic Information
| Setting | Description |
|---|---|
| Form ID (URL Parameter) | The ?fc= value in the form's public URL |
| Form Object | The Salesforce object each submission creates. Click Select Object |
| Form Type | Record Creation creates a Salesforce record. Chat starts a Messaging for In-App and Web conversation with an agent. Survey records a response to a survey link, and sets the Form Object for you |
| Favicon and Logo | Click Select Image to pick an image from your org's Static Resources, shown in the browser tab (favicon) or at the top of the form (logo) |
Features & Options
- Description Position: show field descriptions Above Field, Inside Field, or Below Field
- Post Submit Redirect URL: after a successful submission, visitors see the confirmation with a progress bar for about 3 seconds and are then sent to this address. It must start with
https:// - Disable CAPTCHA: turns off Cloudflare Turnstile verification for this form (not recommended for public forms). Honeypot detection is a separate, org-wide control, so it keeps running when this box is checked
- Show Reset Button: adds a Reset Form button to the confirmation screen, so a visitor can clear the form and submit another response. It suits kiosks, events, and repeated data entry, and is off by default, since most forms are submitted once. Its wording is translatable on the Labels tab
- Show Reference Number: gives each visitor a reference for their submission, never the record's ID. Under Number shown to the visitor, choose:
- Submission reference: a random QuikForms number such as
QF-7K3M9-P2XQ4, stored on the record the visitor created, so your team can find it with Salesforce search when they quote it. The form's object needs a field to hold it: in Setup, open Object Manager, then the object, then Fields & Relationships, and create a Text field of length 20, marked Unique, with Field Label Submission Reference and Field NameQuik_Reference_Number, or, with Setup Automation on, let Do It For Me under Form Objects create it. Then review form access in the Setup Assistant so site visitors can write it. The Settings tab says so if the field is missing. - An Auto Number field on the object, such as Case Number: the visitor gets the number your team will use with them later, so they hold one number, not two. This option is offered when the object has an Auto Number field; on an object without one, such as Lead or Contact, add one in Object Manager to offer it. Review form access in the Setup Assistant afterwards so site visitors can read it.
{reference}in the confirmation message to place it in your own words; otherwise it appears on its own line below the message, after the caption set on the Labels tab (Reference Number Caption), for example Your submission reference: QF-7K3M9-P2XQ4. Left blank, the caption reads "Your submission reference", or "Your reference number" for an Auto Number field. Survey forms do not offer a reference number. - Submission reference: a random QuikForms number such as
- Disable Field Icons: hides the icons next to field labels
- Enforce iFrame Embedding: the form loads only inside an iframe on another page. Opened directly, it shows the same not-found page as a form that does not exist
- Log User Browser Info: records the visitor's browser and IP address on the created record
Why the reset button is a setting rather than something you build
QuikForms strips <script> and event handler attributes from admin-authored HTML on every custom HTML path, which is what stops a form becoming an injection vector. That also means you cannot wire up your own reset button through configuration on any plan, so it is built in instead.
Resetting also clears the saved answers, not just the visible fields, so on a shared kiosk the next visitor's browser does not restore the previous one's answers.
Advanced Settings
- Custom HTML Head: markup added to the page, such as styles. Scripts and event handlers are removed
- Custom Header HTML: HTML shown above the form
- Custom Footer HTML: HTML shown below the form
Scripts and event handler attributes are removed from all three.
Chat Configuration and Survey Configuration
These sections appear on Chat and Survey forms. Chat Configuration holds Create Record Before Chat, Messaging deployment, Sites that can start chats, the Embedded Messaging Code Snippet (only needed if your deployment is not in the list), No Agents Fallback, Agent statuses, and the Chat Context Field Mapping (Open Field Mapper); see Chat Forms. Survey Configuration is described under Creating Surveys.
Multi-page
This section holds the options for forms split into pages. See Multi-page Forms.
Labels Tab
The Labels tab holds every piece of text on the form that is not part of a field, in every language the form offers. At the top is the Languages panel (see Multi-Language Support); below it, each section has an editor per string:
- Form Text Labels: Form Title, Subtitle, Confirmation Message
- Field Labels: Submit Button Label, Other Option Label
- File Upload Labels: Choose Files Button, No Files Chosen Text, Files Chosen Text
- Error Messages: Required Field Error, Invalid Value Error, Correct Errors Message, CAPTCHA Required Error, Generic Submit Error, Submission Failed Error, File Too Large Error, Invalid File Type Error, Verification Failed Error
- Form Placeholders: Select Placeholder, Dismiss Button, Reset Form Button, Reference Number Caption
- Multi-page Navigation and Page Titles: see Multi-page Forms
- Chat Labels and Survey Labels: shown for Chat and Survey forms
- Language Settings: Show Language Picker
Form Editor Tab
The Form Editor tab manages which fields appear on your form and their layout:
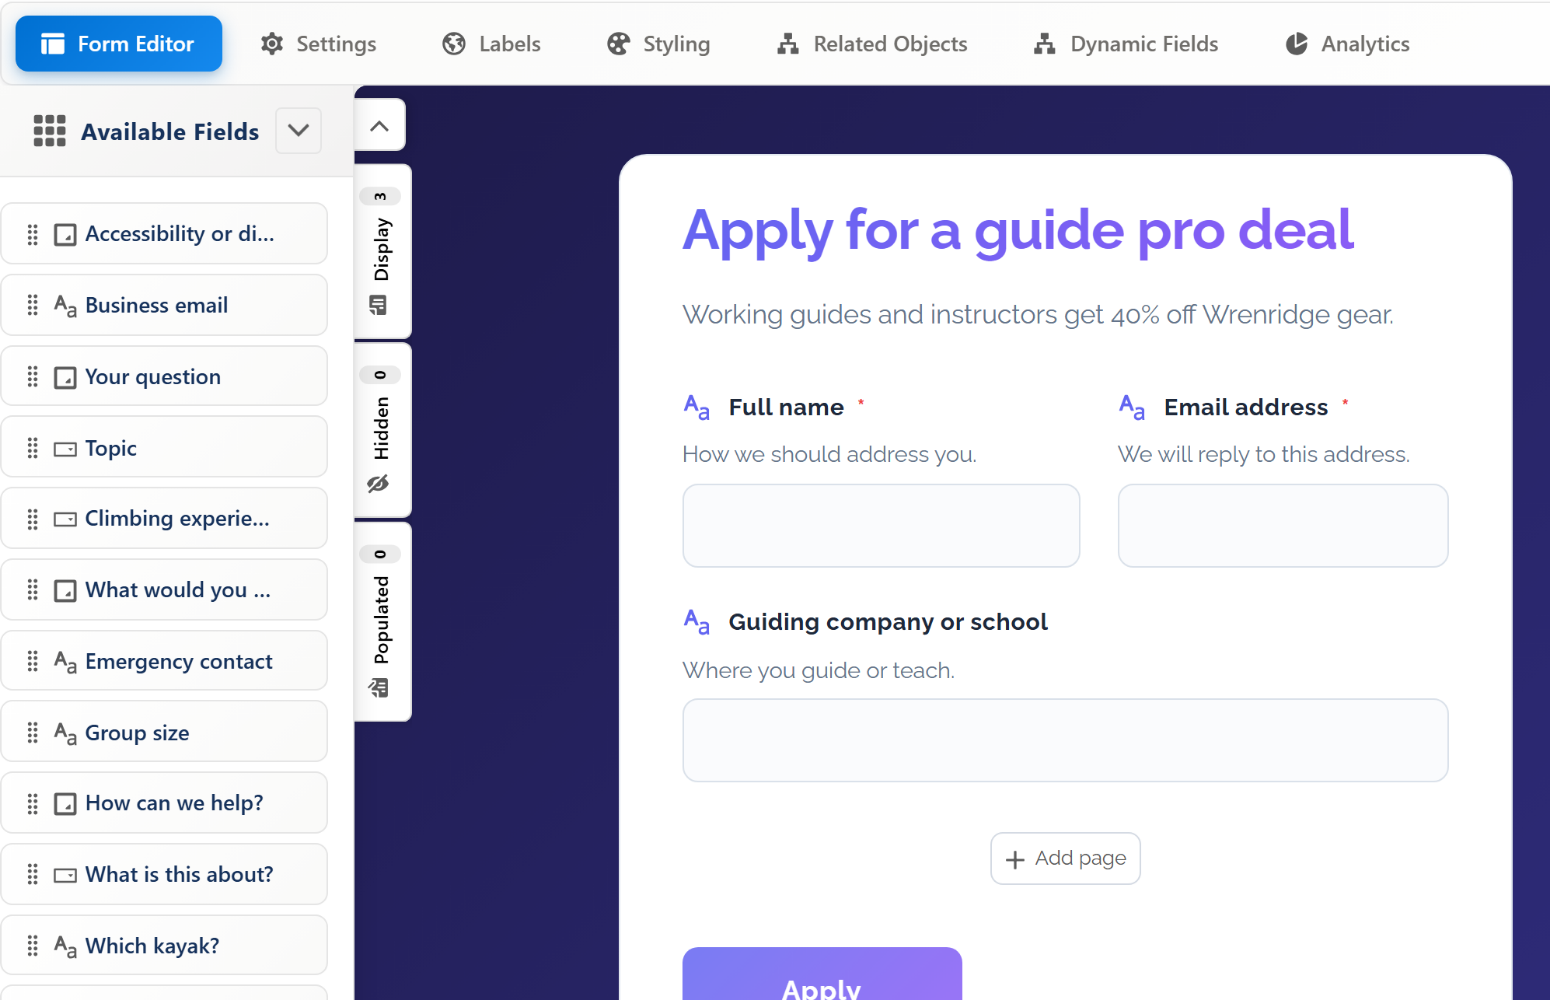
Field Sections
The Available Fields panel lists every field in the QuikField Manager that the form does not use yet; its New button creates a field. The form canvas shows the form as visitors see it, and three drawers list the fields the form uses:
- Display (Display Fields): visible on the form, in order
- Hidden (Hidden Fields): submitted with fixed values but invisible to visitors. The server writes the value you set (or a link's
hfvalue), whatever the browser sends - Populated (Populated Fields): visible with default values that visitors can edit
Managing Fields
- Add a field: drag it from Available Fields onto the canvas or into a drawer
- Reorder: drag fields on the canvas or in the Display drawer, or use the move up and move down arrows
- Move between sections: the Move Field To menu moves a field to Available, Display, Hidden, or Populated Fields
- Set a value: for a Hidden or Populated field, open Set Field Value and enter the Hidden Value or Default Value
- Edit the field: the pencil opens the field editor; label, description, tooltip, and options can also be edited by clicking them on the canvas
Setting Values from a Link
A form link can carry values, so another system can send each visitor a link with their details already in place, such as their email address or a case number. Two URL parameters do this, on Experience Cloud and Salesforce Sites alike:
pf(populated fields): sets the starting value of any editable field on the form, replacing its Default Value if it has one. Visitors can still change it. A Read Only field takes the value from the link only if you allow it (below)hf(hidden fields): replaces the Hidden Value of a field in the Hidden drawer, only if you allow it (below). It cannot add a hidden field the form does not have
A link can change a hidden value, or a Read Only one, only for fields where you tick Link can set this value in Set Field Value. Every other hidden and Read Only field keeps the value you set, whatever a link says. Leave it off for values such as owner, record type, or routing.
Each value is Base64-encoded text of fieldId:value pairs separated by commas, using each field's Field ID. If a value contains a comma, encode a JSON object instead:
email:jane@example.com,caseNumber:00012345   (text before encoding)
{"company":"Smith, Jones and Co"}           (JSON, for values with commas)

https://[your-form-address]?fc=contact-us&pf=ZW1haWw6amFuZUBleGFtcGxlLmNvbQ==
Under Settings in the builder, Generate Encoded URL String next to Hidden Fields and Populated Fields builds an example value from fields you pick. A system that makes links for each visitor encodes the text itself; every programming language has a Base64 function.
Encoding is not a lock
Base64 keeps a value from being edited by accident, but anyone can decode it and build their own link. Tick Link can set this value only for a value a visitor may choose. The server always writes the Hidden Value you set and the Default Value of a Read Only field, whatever the browser sends, unless the field allows a link and the link carries a value.
Column Widths
The form is six columns wide. Set Column Width gives each field 1 to 6 columns:
- 1-2 columns: narrow fields (checkboxes, short text)
- 3 columns: medium fields (name, email), two to a row
- 6 columns: full-width fields (text areas, long text)
Saving
Nothing is saved automatically. Layout changes are saved with Save Form. Changes to a field's own properties are saved with Save Field Changes and apply to every form that uses the field. Save All saves both.
Styling Tab
Customize the visual appearance of your form:
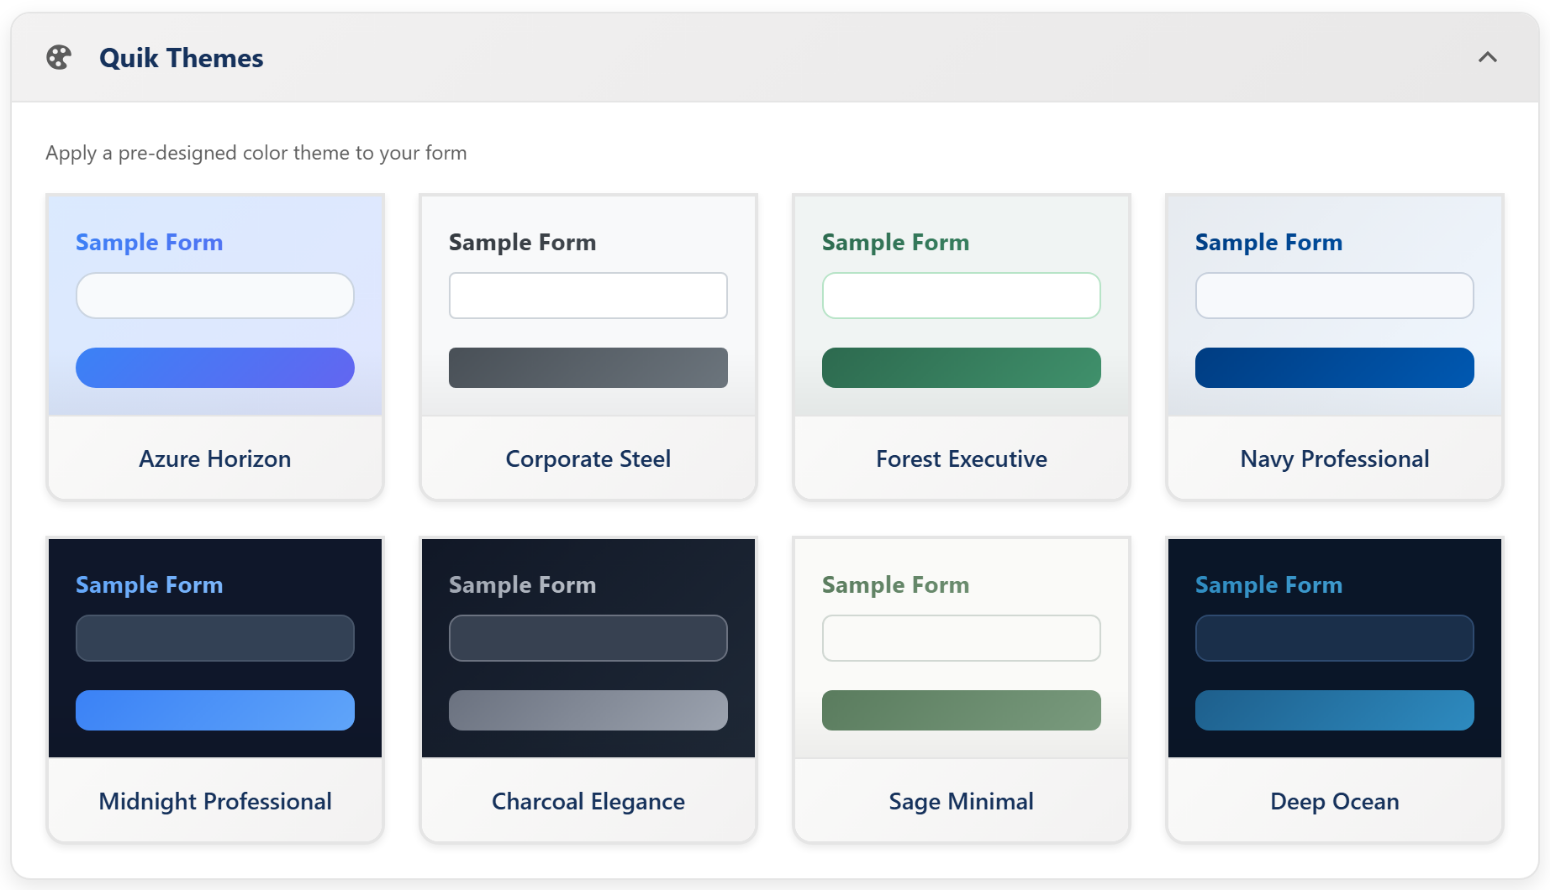
Quik Themes
Apply one of 8 pre-designed color themes, then adjust any color you like:
- Azure Horizon (Blue professional)
- Corporate Steel (Gray corporate)
- Forest Executive (Green professional)
- Navy Professional (Navy blue)
- Midnight Professional (Dark blue)
- Charcoal Elegance (Dark gray)
- Sage Minimal (Light green)
- Deep Ocean (Dark ocean blue)
Colors (15 properties)
The two Form Gradient Colors, Gradient Color 1 and Gradient Color 2, define the form's gradient. Every other color property can be a Single Color, the Form Gradient, or a Custom Gradient of its own two colors. They are grouped under Main Colors and Component Colors:
| Color Property | Usage |
|---|---|
| Gradient Color 1, Gradient Color 2 | The form gradient, used wherever a property is set to Form Gradient |
| Background Color | Main form background |
| Text Color | Body text |
| Button Color | Submit button background |
| Highlight Color | Links and accents |
| Border Color | Form border. Defaults to the Background Color |
| Content Background | The form's content area |
| Title Color | Form title text |
| Logo Background | Behind the logo |
| Input Background | Field background |
| Input Text Color | Text typed into fields |
| Description Text Color | Field descriptions |
| Input Border Color | Field borders. Defaults to the Input Text Color |
| Error Color | Validation errors, and value messages that disable the submit button. Defaults to a standard red |
Layout & Typography
- Content Container Width: the form's width, for example
575px,100%, or50rem - Border Width: the form border's thickness, for example
1px - Container Border Radius: the form's corners, for example
24px - Input Border Radius: field corners, for example
12px - Font Family: one of 30 fonts that come with QuikForms, or the default system font. QuikForms serves them from your own org, so a visitor's browser never contacts a font service:
- Sans serif: Roboto, Open Sans, Lato, Montserrat, Poppins, Inter, Raleway, Nunito, Work Sans, IBM Plex Sans, Outfit, Source Sans 3, Ubuntu, Nunito Sans, Barlow, Manrope
- Serif: Merriweather, Playfair Display, Lora, PT Serif, Crimson Text, Bitter, Libre Baskerville
- Display and decorative: Bebas Neue, Righteous, Pacifico, Comfortaa
- Monospace: JetBrains Mono, Fira Code, Source Code Pro
- Your own font: upload it as a
.woff2,.woff,.ttf, or.otffile (.woff2loads fastest) in Setup, Static Resources, with Cache Control set to Public, choose Your own font (static resource) and enter the resource's Name. Check confirms visitors can get it. It is served from your org like the others, and the font's license must let you serve it from your website.
- CAPTCHA Theme: Auto (matches the visitor's system setting), Light, or Dark
- CAPTCHA Size: Flexible (stretches to the form's width), Normal (300px), or Compact (150px)
- CAPTCHA Mode: Managed shows a checkbox only when a visitor looks suspicious; Non-Interactive never asks for a click; Invisible shows nothing at all
Reset to Defaults puts the styling back to the default look, after asking you to confirm. Click Save Form to keep your changes.
Related Objects Tab Professional
On Standard: this tab is not shown, and a form creates a record on a single object. Multi-object forms, which create a parent and its children in one submission, require the Professional plan.
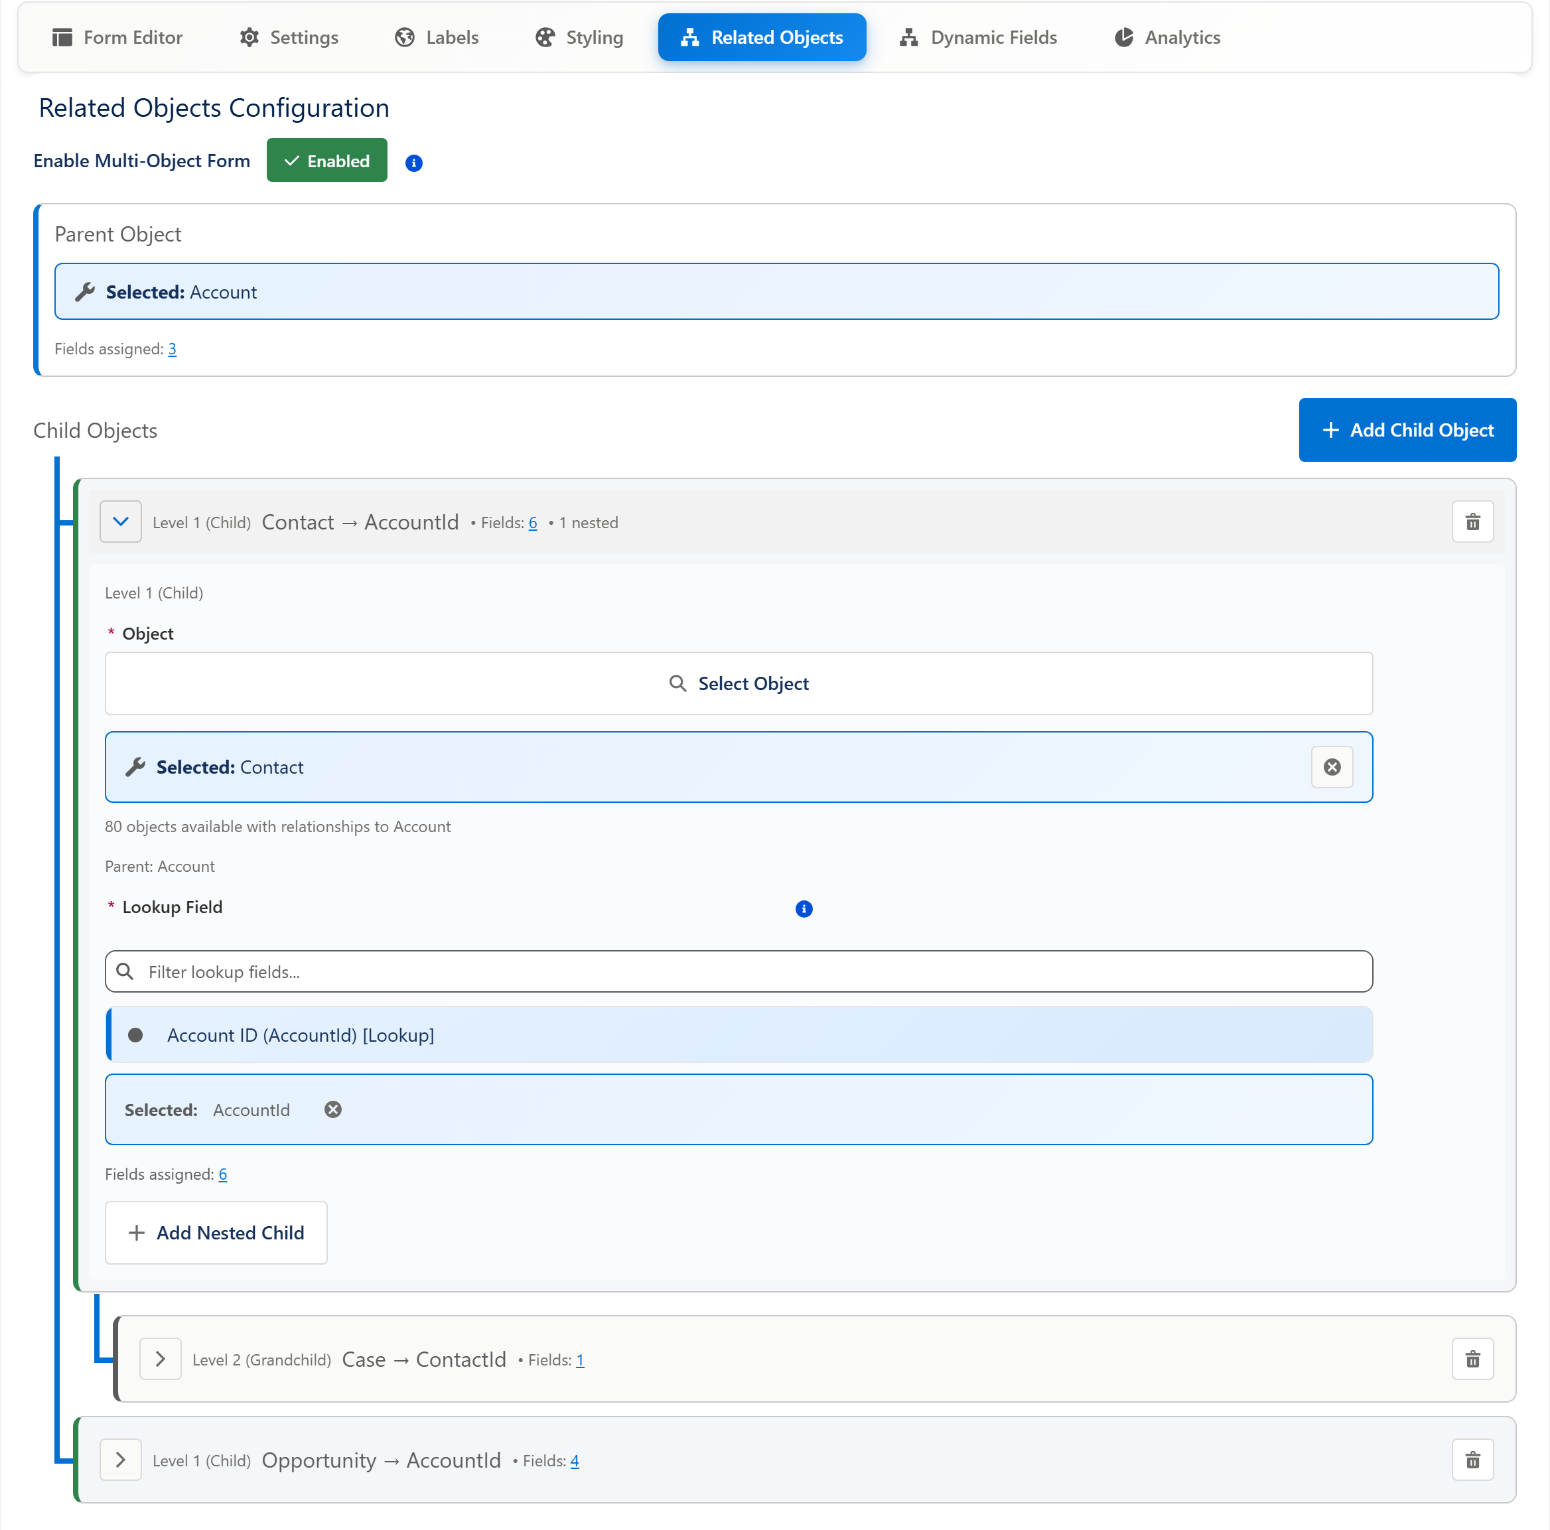
Configure multi-object forms for complex data structures:
Hierarchy Levels
QuikForms supports up to 3 levels of object relationships:
- Level 1: the parent object, the form's Form Object
- Level 2: direct children of the parent
- Level 3: children of those children
Configuration Steps
- Turn on Enable Multi-Object Form
- Click Add Child Object and choose the object
- Choose the Lookup Field that links the child to its parent
- Assign fields to each object
- Click Add Nested Child on a child for a third level, if needed
Validation Requirements
All objects in the hierarchy must have an object type and lookup field selected before saving.
Each object type can appear only once in a form's tree, the Form Object included, because a submission fills an object's fields by type. The tab warns on a repeated object, and the form cannot be saved until it is removed.
Dynamic Fields Tab
Make the form react to what a visitor selects. The tab has two sections, both keyed on the options of a choice field (a select list, a checkbox, or any field with options):
Dynamic Field Visibility
Show a field only when a trigger field has one of the chosen values:
- Click Add Trigger Field and choose the Trigger Field
- Click Add Dependent Rule and choose the Dependent Field
- Under Show when values selected, move the values that reveal it to Selected
Add a rule for each dependent field. A field hidden this way is not required and is never validated, in the browser or on the server.
Value Messages
Show a message when a visitor picks particular options, and optionally hold the form until they choose differently:
- Click Add Message Field and choose the Field
- Click Add Message. Under Show when values selected, select the option or options that trigger it (the free-text Other option is offered when the field has one), and write the Message
- Choose Display: Inline, next to the field shows a panel, placed above or below the field by Position; Modal, must be dismissed opens a dialog the visitor must close
- Tick Disable submit button when selected to keep the form from being sent while that option stays chosen. The server enforces this too, so it cannot be bypassed
- Click Translate to write the message in every language the form offers (once it has more than one, the button shows the number of languages), or leave it to the AI translation wizard, which covers value messages along with everything else
On a form with several languages, Show options in picks the language the option lists are shown in. It changes only what you see: a message matches its option in every language.
Works in every language
Rules are matched by option position, not text, so a rule written against "Yes" also fires for a visitor who selected "Ja" or "Oui". Messages and panels follow the form's colors, fonts, and corner styling; the modal's button uses the submit button's style. A message that disables the submit button uses the Error Color from the Styling tab.
Prefilled values
A modal message whose option is already selected when the page loads, for example through a prefilled value, is shown inline instead. Nothing pops up unasked.
Multi-page Forms
Split a long form into steps. Visitors move through the pages with Back and Next, see where they are in a step indicator, and can check every answer on a review page before they submit. What they typed survives a page reload.
Splitting the form
Pages are edited on the Form Editor canvas, where every page is stacked with its own header:
- Hover over the field that should start a new page and click the scissors icon, Start a new page at this field. That field and every field below it move to the new page
- Click Add page at the bottom of the canvas for an empty page, then drag fields into it. A field is dragged between pages the same way it is dragged within one
- Click a page's title or description to edit it, in every language the form offers. The arrows in a page header move that page break up or down one field, or drag the page break (the header's grip, or the dashed break line) to wherever it belongs; the delete control merges a page back into its neighbour
The Display drawer offers the same controls in a compact list: each page is a row with its fields beneath it; rename, add, or remove pages from the row, drag the row to move the page break between fields or nudge it with the arrows, drag fields between pages, and the Move field menu lists the pages as destinations.
A form with one page shows all of its fields at once, with no stepper or page buttons. Those appear only when you add a second page or turn on the review page.
Multi-page settings
The Multi-page section of the Settings tab holds the options that apply to every page:
- Progress indicator: Numbered steps with page titles, Progress bar, or None (buttons only). Numbered steps let visitors jump back to a page they completed
- Show page titles above each page's fields
- Resume within the session: typed answers are kept in the visitor's browser tab until the form is submitted, so a page reload or a language switch does not lose them. They do not survive closing the tab. Masked, file, and signature fields are never kept. Turn it off for shared or kiosk devices
- Review page before submit: a final page listing every answer grouped by page, with an Edit link per group that jumps back to that page. The submit button and CAPTCHA move to the review page when it is on. Review page title sets its heading (default: Review your answers)
The Next, Back, Step {0} of {1}, and Edit labels (Next Button, Back Button, Page Progress, and Edit Link) are translated on the Labels tab under Multi-page Navigation, and every page title and description, plus the review page's, appears there under Page Titles with the same per-language editors and AI translate button as any other string. Clicking a title on the canvas or in the drawer opens the same editor.
What visitors see
- Next checks the current page and shows any errors right there. Back never validates, so nothing stops a visitor going back to fix something
- Pressing Enter in a text field moves to the next page rather than submitting
- The step indicator reaches earlier pages, and the review page once the visitor has reached it. So after using Edit on the review page, a visitor can jump straight back to the review
- A page whose fields are all hidden by dynamic field rules is skipped in both directions and dimmed in the step indicator
- A value message that disables the submit button also disables Next on its own page
- Submitting checks every page. The first page with a problem opens with the error shown, including problems the server reports
Let the AI lay out the pages
Ask the AI assistant to "split this form into pages" or "make this a three-step form with a review page". It groups related fields, names each page, and puts uploads and signatures last. The translation wizard covers page titles, descriptions, and the review page title along with everything else.
Both renderers, same behavior
Multi-page forms behave identically on Experience Cloud sites and on Salesforce Sites. Plugins can react to navigation through the onBeforePageChange and onPageChange hooks, and the Progress Indicator example plugin follows the visitor from page to page.
Previewing a Form
Test your form before publishing:
Preview in the builder header opens the version you are viewing, draft included, on your public site in a new browser tab: on Experience Cloud or Salesforce Sites, exactly as visitors will see it. It needs a Public Site URL, set in the Setup Assistant.
Preview Features
- The form as currently saved, with all styling applied (colors, fonts, layout)
- Working submission, which creates real records
- Signed preview links that expire after 8 hours and cannot be altered to open a different form
Version Control
Every form keeps its history. A version is a draft, published, or archived:
Version States
| State | Description |
|---|---|
| Draft | Unpublished changes, not publicly accessible |
| Published | The version visitors see at the public URL, unless the form is offline. Read-only in the builder: its layout, pages, settings, text, and styling cannot change, and each tab offers Create draft. Field definitions can still be edited from the canvas or the field library, and those edits apply immediately to every form using the field |
| Archived | A previously published version, kept for history and rollback. Only the 50 most recent archived versions are retained; older ones are deleted permanently. |
Publishing Workflow
- Make changes in the draft and click Save Form
- Test with Preview
- Click Publish
- Under Version Type, choose Major or Minor; the version number is calculated for you
- Optionally add a Version Tag
- Click Publish
The previously published version is archived. Publishing always puts the form online, including a form that was taken offline; the publish dialog says so when it is offline.
Version History
Click History in the builder header. The Version History lists every version with these columns:
| Column | Description |
|---|---|
| Version | The version number |
| Status | Draft, Published, or Archived |
| Tag | The version tag given when it was published |
| Last Modified | When the version last changed |
| Actions | Load opens the version in the builder. Rollback, on the published version and every archived one, creates a new draft that copies that version, so you can restore an older form by publishing the draft. Delete removes a draft. Export downloads the version as JSON |
Version history and rollback are available on every plan.
One Draft Per Form
Each form can have only one draft at a time. Publishing a draft creates a new published version and allows creating a new draft.
Taking a Form Offline
A published form can be taken offline without deleting anything, and put back online later. This is how to retire a form that has surveys, which cannot be deleted.
- In the builder: the header shows Live or Offline. Click Take Offline and confirm, or Go Live to put it back.
- In QuikForms Manager: use the row action Take Offline or Go Live. The Status column reads Live, Offline, or Not published, and the Status filter selects any of them.
The change takes effect immediately; it does not wait for a publish. While a form is offline, visitors who open it see a page-not-found page and its survey links stop working. Submissions already received are not affected. Publishing a new version puts the form back online.
QuikField Manager
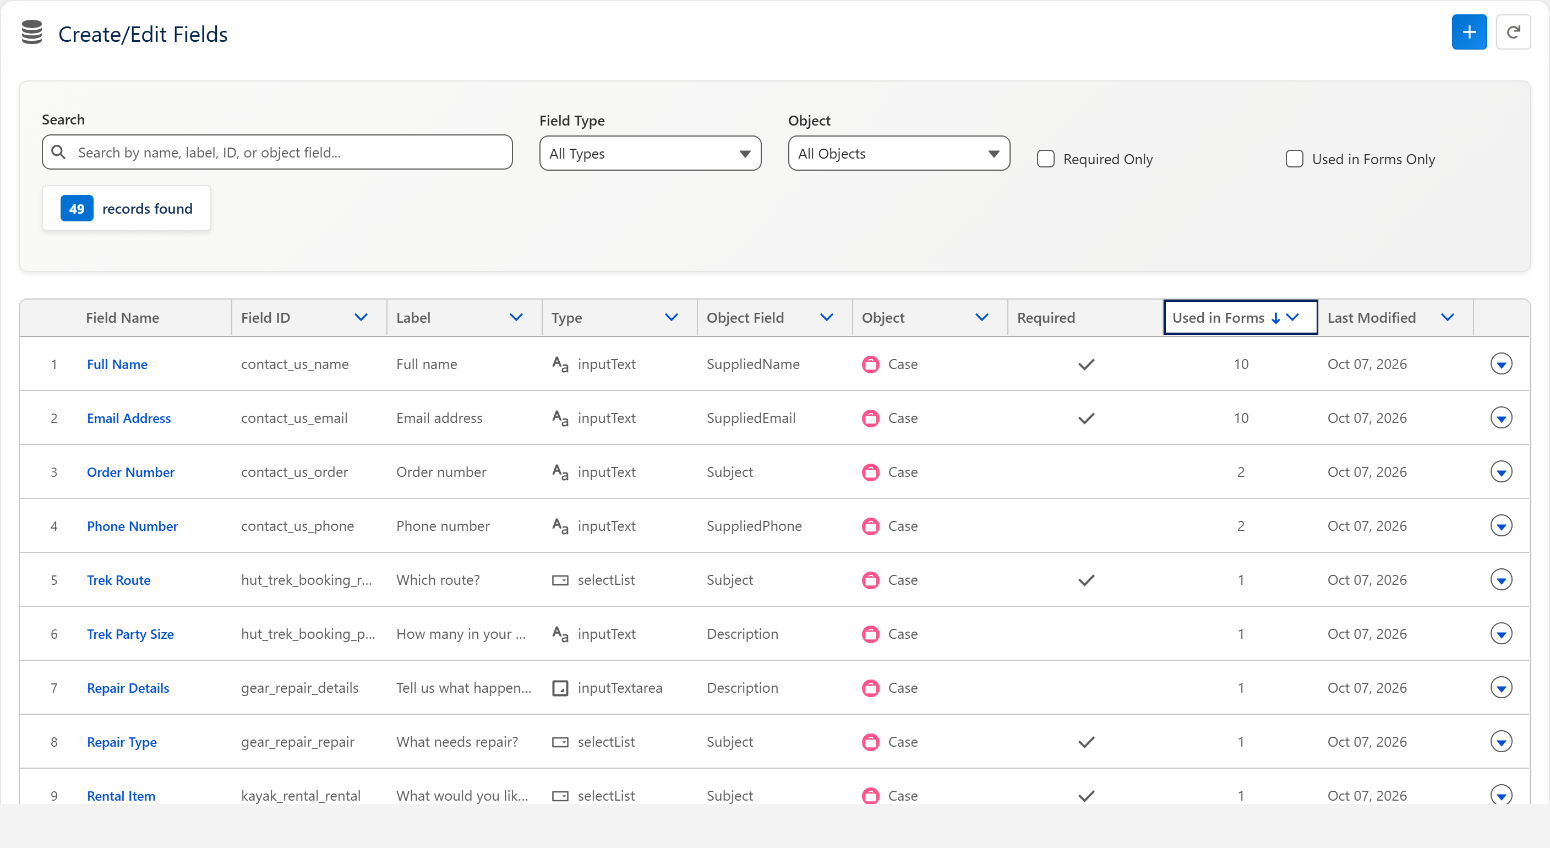
The QuikField Manager is the shared library of reusable form fields. A field is defined once and can be used on any number of forms. The list shows each field's Field Name, Field ID, Label, Type, Object Field, Object, whether it is Required, and how many forms use it; filter by Field Type or Object, or show only required fields or fields used in forms. Each row can be opened with Edit, copied with Clone, or removed with Delete.
Field Types
QuikForms supports 8 built-in field types:
| Type | Description | Use Cases |
|---|---|---|
| Text Input | Single-line text input | Name, email, phone, short answers |
| Text Area | Multi-line text area | Messages, descriptions, long text |
| Select List | Choice field. The Custom Structure Type setting renders it as a dropdown, radio buttons, or checkboxes | Any single-choice or multi-choice question |
| Checkbox | Single checkbox | Yes or no values, agreements |
| Date | Date picker | Event dates, birthdays |
| Date Time | Date and time picker | Appointments, timestamps |
| Signature | Canvas signature pad, stored as a file on the created record | Consent, sign-off, delivery confirmation |
| Custom HTML | Rich HTML content | Instructions, headings, formatted text |
On the Professional plan, an active plugin can also render a field with its own control, such as a range slider; see Plugin Field Type below.
Creating Fields
To create a new field:
- Open the QuikField Manager tab and click New, or click New in the builder's Available Fields panel
- Optionally start from one of the Quick Start Templates: Email Field, Phone Field, Subject Field, Message Field, Priority Dropdown, or Star Rating
- Fill in the field properties (see Field Editor Interface)
- Click Save
To make a variation of an existing field, use Clone on its row.
Field Editor Interface
The Field Editor has six tabs: Basic Info, Field Mapping, Validation & Behavior, Options & Structure, Form Usage, and Preview.
Basic Info
| Property | Description |
|---|---|
| Field Name | The name admins see in the field library and the builder |
| Field ID | Unique identifier used in form configurations. Renaming it updates every form that uses the field |
| Field Type | One of the 8 field types |
| Icon Name | An SLDS utility icon name shown next to the label, for example email or phone_portrait |
| Label | The label visitors see above the field, with a value per language |
| Description / Help Text | Help text shown with the field, per language. For a Custom HTML field this is Custom HTML Content instead |
| Tooltip | Text shown when a visitor hovers over the info icon next to the label, per language |
Field Mapping
This tab links the form field to a Salesforce field:
- Target Object: the Salesforce object. Click Select Object; it starts as Case
- Object Field: the field on that object. The list shows each field's label with its API name in brackets
- Special Field Values:
$ATTACHMENT: a single file upload, saved as an attachment on the record (images, PDF, Word, and text files)$CONTENTDOCUMENT: multiple file uploads, saved as Salesforce Files on the record, with more file types (adds Excel, PowerPoint, CSV, ZIP, and RAR)Quik_Extra_Fields__c: stores the answer in the record's Quik Extra Fields, for answers with no field of their own. Offered on objects prepared under Form Objects
Validation & Behavior
- Required Field: the visitor must fill it in
- Read Only: shown but not editable. When the field has a Default Value (or a link's
pfvalue), the server writes that value whatever the browser sends - Mask Field: hides what is typed, like a password field
- Validation Regex: a pattern the value must match. Generate with AI writes one from a description (see Field Validation)
Options & Structure
- Custom Structure Type, Decorator Style, Include 'Other' Option, and Options: see Custom Structures
- Enable 2GB Uploads (Experience Cloud only): for a
$CONTENTDOCUMENTfield, uses Salesforce's own file upload control on Experience Cloud sites, for files up to 2 GB. The site has to allow it first: see Large File Uploads. Until then, and on Salesforce Sites, the field uses the standard upload (4 MB per file on Experience Cloud, 9 MB on a Salesforce Site) - Plugin Field Type Professional: renders the field with a custom control from an active plugin, such as a range slider. The Field Type above is used if the plugin is not active. Plugin field types work on both Experience Cloud and Salesforce Sites
- Plugin Configuration (JSON): settings for the field's plugin, in the format the plugin documents. It starts from the plugin's default configuration and is checked before saving
Form Usage and Preview
Form Usage lists the forms that use the field; click a form name to open it in the builder. Preview shows the field as it will render.
Custom Structures
A choice field's options, and how they are displayed, are set on the field editor's Options & Structure tab, or from the canvas in Edit Options & Structure:
- Custom Structure Type: Select List (Dropdown), Radio Buttons, or Checkboxes (checkboxes allow several choices)
- Decorator Style: Stars Rating shows the options as a star rating, Little Boxes shows each option as a selectable box, and Toggle shows a toggle
- Include 'Other' Option: adds an Other choice with a text box for the visitor's own answer
Editing the options
Click Edit Options. In the options editor:
- Click Add Option and type the option's text. Reorder options with the up and down arrows, or delete one
- For a form in several languages, pick a language under Show option labels in and enter each option's text in it. The list holds the languages the form offers (when you edit the options from the form) and the ones the field's label uses; add a language on the form's Labels tab. Options are matched by position, so the third option in German is the translation of the third in English
- Click Save Options
Field Validation
Add validation with regex patterns. Fields are checked as the visitor fills them in, not only on submit:
- A pattern is checked when the field loses focus, and the error clears the moment the value is fixed
- A required field shows its error on leaving it only after the visitor typed in it and cleared it, so tabbing through the form to read it does not turn it red. Submitting still checks every required field
- The server checks the same patterns the same way on every submission, surveys included, and reports each problem against its field in the visitor's language. Fields hidden by a dynamic field rule are skipped
A pattern is a search, as in a browser: \d{5} accepts any value that contains five digits in a row, so anchor it with ^ and $ to match the whole value. QuikForms refuses to save a pattern a browser cannot run. Generate with AI, next to Validation Regex on the field editor's Validation & Behavior tab, writes a pattern from a plain description (Describe what this field should accept), explains it, and shows examples it Accepts and Rejects, checked against the real pattern. Click Use this to keep it.
Error wording comes from the form's Labels tab (required, invalid value, file too large, invalid file type, verification failed), with {0} standing for the field label, and can be translated like any other label.
Common Validation Patterns
| Use Case | Regex Pattern |
|---|---|
^[a-zA-Z0-9._%+-]+@[a-zA-Z0-9.-]+\.[a-zA-Z]{2,}$ |
|
| Phone (US) | ^\(?([0-9]{3})\)?[-. ]?([0-9]{3})[-. ]?([0-9]{4})$ |
| ZIP Code (US) | ^\d{5}(-\d{4})?$ |
| URL | ^https?://[^\s]+$ |
| Numbers Only | ^\d+$ |
QuikForms AI
QuikForms AI is an agentic assistant that reads and writes the same records the builder does, through the same service layer. It does not drive the UI, and it cannot do anything you could not do yourself.
How AI Is Connected
QuikForms AI runs on Anthropic's Claude models, and every plan includes a monthly AI allowance for it. Your org can be connected to the models in two ways:
| QuikForms AI (included in your plan) | Your own Anthropic key | |
|---|---|---|
| Who you are billed by | QuikForms, as part of your plan | Anthropic, directly |
| Usage limit | The monthly AI allowance that comes with your plan | Whatever your own Anthropic account allows. QuikForms does not meter it |
| Setup | One click: Activate AI in QuikForms AI Setup | Create a key in the Anthropic Console and paste it into QuikForms AI Setup |
Using the AI included in your plan
There is no key to collect or paste. Click Grant Me Access in the Setup Assistant, then open QuikForms AI Setup (see below) and click Activate AI. QuikForms fetches its credential, stores it in your org, and activates the AI provider. The AI buttons appear across QuikForms a few seconds later, without a page refresh. Nothing is activated until you click: opening a page never turns AI on.
Using your own Anthropic key
Create a key in the Anthropic Console under Settings → API keys, then enter it in QuikForms AI Setup. Two things to check in the Console:
- It must be an ordinary API key (it starts
sk-ant-api), not an Admin key. Each is rejected where the other is expected. - Set a spend limit on the key's workspace. QuikForms cannot cap what your own account spends, and a workspace spend limit is the only hard ceiling Anthropic enforces.
Anthropic is the only AI provider QuikForms supports. Usage on your own key is between you and Anthropic: QuikForms does not meter it, and you will not see an allowance meter in the builder.
Credentials are stored in Salesforce, never in a form
Whichever route applies, the credential is stored encrypted in a Salesforce Named Credential. It is never written to a form, a submission, or a log, and nobody can read it back out of QuikForms. To replace your own key, enter the new one in the same setup task.
QuikForms AI Setup
Open the Setup Assistant and click QuikForms AI Setup. The panel first shows what happens to data when QuikForms AI is used:
Before you turn on QuikForms AI
When someone uses a QuikForms AI feature, their request and the information it needs leave Salesforce. That includes the form's design and settings, and for error explanations the text of the error log, which can quote a submitted value. With QuikForms AI it goes to the QuikForms AI service and on to Anthropic; with your own key it goes straight to Anthropic. Once it leaves your org, Salesforce's security and privacy protections no longer apply to it, and Salesforce is not responsible for it. Form submissions are never sent.
Under How do you want to power QuikForms AI? there are two cards:
- QuikForms AI (Included in your plan). Its badge reads Ready once the credential is stored, Setting up… while it is being collected, Waiting for activation in the first moments after installing, before QuikForms activates the AI included in your plan, or Subscription ended once your subscription has ended, when QuikForms AI is off.
- Your own Anthropic key (Billed to your Anthropic account). Choosing it shows the Anthropic API Key box; its badge reads Key stored once a key is saved.
The Setup Status list shows three checks: the credential for the chosen card (AI credential stored or API key stored), Access granted (QuikForms Admin permission set), and AI provider active.
The main button acts on the card you selected:
- With QuikForms AI selected: Activate AI collects the credential and switches the provider on, and Use QuikForms AI switches back to it from your own key.
- With your own key selected: Connect stores the key, grants you QuikForms access (the QuikForms Admins group), activates the provider, and makes a real test call, in that order. Once connected the button reads Update Key, or Use My Own Key when the org is currently using QuikForms AI.
Once a provider is active, a test button checks the connection: Test QuikForms AI or Test My Anthropic Key. If an activation did not finish, the panel shows why.
Who sees AI
AI buttons appear only for users who can reach the AI credential, through the QuikForms Admin permission set directly or the QuikForms Admins group. For everyone else, and in an org where AI is not connected, AI controls are hidden rather than shown disabled. An administrator can turn every AI feature off for the whole org under Setup Assistant → Settings → Features → AI Features Enabled.
Where AI Appears
Every AI surface is triggered by an explicit click. Opening a page never uses your AI allowance.
| Where | What it does | Trigger |
|---|---|---|
| QuikForms Manager | Builds a new draft form from a description | Create with AI |
| Form builder | Builds and edits a form from a description, in the QuikForms AI panel | The AI button, then sending a message |
| Labels tab, Languages panel | Translates every string into your chosen languages, for you to review before saving | Translate with AI |
| Field editor, Validation & Behavior tab | Generates a validation pattern with examples | Generate with AI, then Generate |
| Analytics tab Professional | Explains what your numbers mean | Analyze with AI |
| QuikForms Error Manager | Digests the currently filtered logs | Summarize (N) |
| Exception log details | Explains one exception in plain language | Explain with AI |
A result that goes stale is removed, not silently regenerated. Changing a date range or a filter clears the previous answer and restores the button, because the numbers it described no longer exist and running it again uses allowance you should choose to spend.
What the AI Cannot Do
| Guarantee | How it is enforced |
|---|---|
| Only edits a Draft | Every mutating operation re-checks version status, not just the first one |
| Cannot exceed your rights | All writes run as the current user; all queries enforce field-level security |
| Cannot invent a field | Object fields are validated against a live describe call |
| Cannot change other forms | A shared field is cloned before editing, never modified in place |
| Cannot be left running | Stop is checked between every step and every tool call |
| Cannot leave a mess | Undo restores the draft and deletes fields the AI created |
| Can be switched off | One org-wide setting, AI Features Enabled, disables every surface |
Undo and Field Review
Undo is scoped to the last turn and survives a page refresh. It restores the draft and removes fields the AI created, keeping any field another form has since adopted and telling you which.
Review Fields appears when the AI edits a field that other forms share. Rather than changing it underneath them, it creates a temporary variant used only by your draft. You then merge the change back into the shared field or fork it into a separate named one.
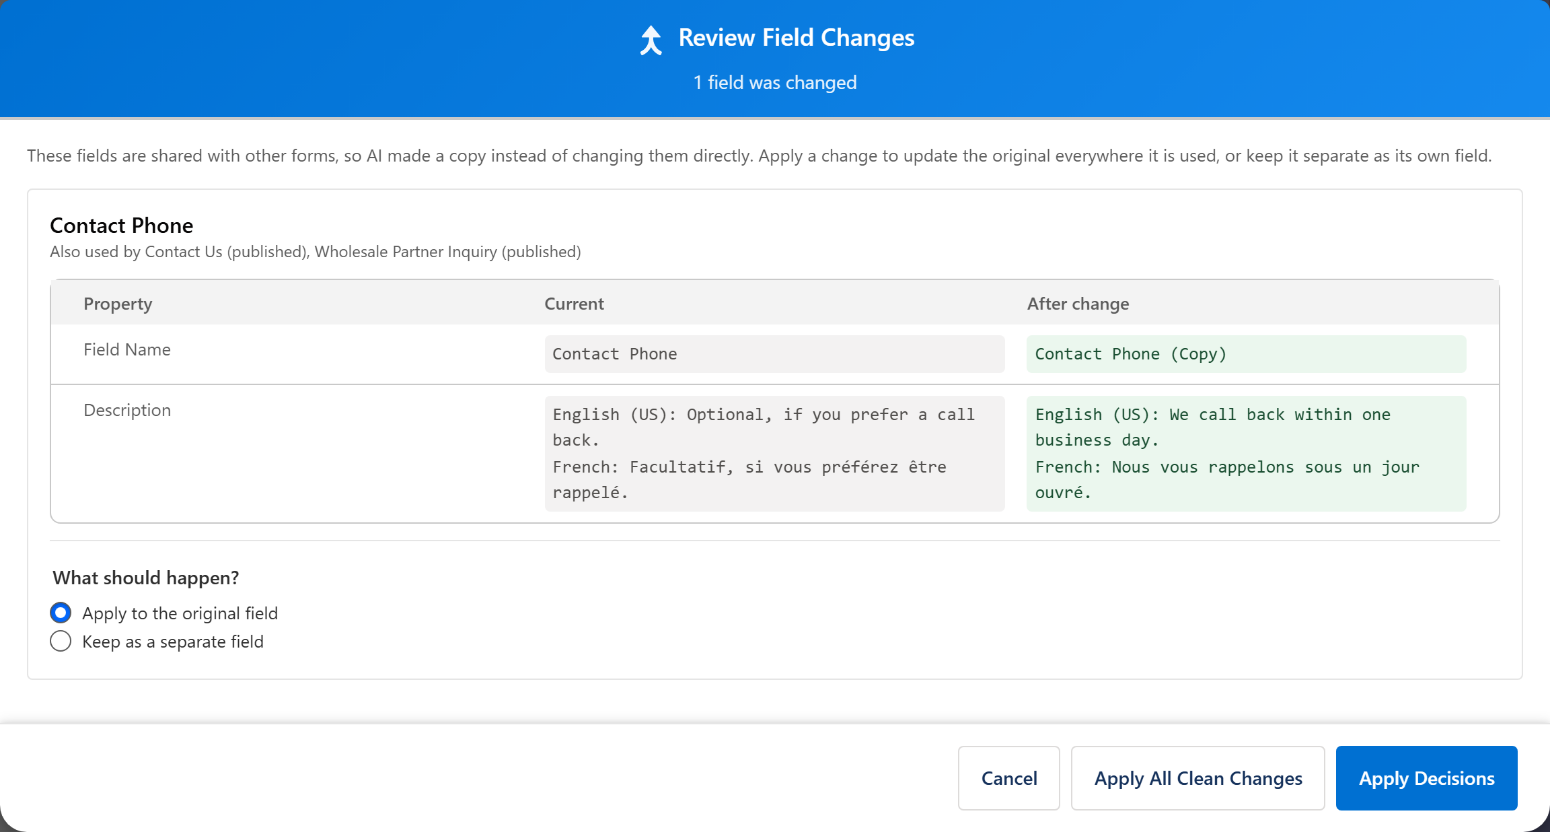
What the AI Sees
The AI sees what you type to it, the form configuration (field names, labels, layout, and validation rules), and, for Analyze with AI, aggregate counts (how many sessions started a form and which field they stopped at).
Explain with AI and Summarize also send the text of the exception logs involved. An error message can quote a value a visitor submitted, so a log can carry personal data even though QuikForms never sends submissions on purpose.
Apart from that, it never receives submitted values, the records your forms create, or anything identifying a visitor. Analytics stores counters only, never what anyone typed, so per-field detail can say a field was left empty but never what would have gone in it.
Allowance and Billing
Every plan includes a monthly AI allowance, sized well beyond normal use.
| Plan | Roughly covers | First 45 days |
|---|---|---|
| Standard | Several hundred forms per month | Double allowance |
| Professional | Over a thousand forms per month | Double allowance |
The doubled onboarding period is automatic and needs no request. It exists because AI use is front-loaded: most orgs build their forms when they first adopt QuikForms and then go long stretches without touching the assistant.
Free trials carry a much smaller allowance and do not receive the onboarding double, because the trial is itself an evaluation period. It comfortably covers creating and refining a few forms. During a trial the AI panel always shows your remaining allowance, so nothing stops without warning. On a paid plan the meter appears once 80% of the month's allowance is used.
Sandboxes share your allowance
The allowance belongs to your company, not to each Salesforce org. A sandbox created or refreshed from your production org carries QuikForms with it, and AI used there counts toward the same monthly allowance as production.
A sandbox where you install QuikForms directly, rather than one refreshed from production, starts as a free trial, the same as a first install anywhere. When you subscribe, we link it to your production org: the trial ends, and it shares your plan and your monthly allowance from then on. If a sandbox of yours is still on its trial after you subscribe, contact support and we will link it.
One way to work is to build and refine forms in a sandbox, then move them to production with Export and Import on the Forms Dashboard. Importing a form uses no AI allowance.
What actually consumes the allowance
Conversation length drives it, not form count. Creating a form from a single description is inexpensive. Each follow-up message in the same conversation costs progressively more, because the assistant re-reads everything said so far. A form built in one instruction costs a fraction of one refined over a dozen exchanges.
This has two practical consequences. Starting a fresh conversation for an unrelated change is cheaper than continuing a long one. And the other AI features (translation, validation patterns, analytics insights, and log digests) use a smaller model and barely register against the allowance.
If you reach the limit
You are emailed at 80%. At 100% the AI assistant pauses until the allowance resets at the start of your next billing period. Nothing else is affected: published forms keep serving traffic, submissions keep landing in Salesforce, analytics keeps recording, and every non-AI feature works normally.
Because the allowance is sized so far beyond typical use, reaching it usually means something unexpected is running rather than heavy legitimate work. Get in touch and we will help you work out what consumed it. Unused allowance does not carry forward: QuikForms is a subscription to the whole product, not a bundle of AI usage.
If you would rather not be metered at all, connect your own Anthropic key in QuikForms AI Setup. Usage on your own key is between you and Anthropic.
Multi-Language Support
A form can be offered in several languages, with every label, message, option, and page title translated. Visitors choose their language from a picker on the form, and a form shows its default language until they do.
Configuring Languages
Languages are managed from the Languages panel at the top of the builder's Labels tab. Each language shows how complete its translations are.
- Add language opens Add a language: pick a Language, or type any code under Or enter a language code (for example
frorfr_FR, whatever your other systems expect), then Continue - Translate with AI adds languages and translates every label, message, and choice option at once (see below)
- The pencil on a language edits its translations; the AI icon translates that language with AI
- Make default sets the language shown when a visitor has not chosen one; the current one is marked Default
- Drag languages to reorder them. The order here is the order visitors see in the language picker
- Remove a language with its delete control. Where the language also lives on shared field records, you choose whether to remove it from those too
To show the picker on the form, tick Show Language Picker under Language Settings at the bottom of the Labels tab, and click Save Form.
Linking to a Language
Add locale to the form's address to open it in a particular language, with or without the picker: ?fc=contact-us&locale=fr_FR. Use the language's code exactly as it appears in the form's Languages panel (for example fr_FR, de, or a code you entered yourself); a code the form does not have opens it in its default language. Without locale, a visitor sees the form's default language until they choose another. This works on Experience Cloud and Salesforce Sites alike, and in survey links.
Translate with AI
The translation wizard translates the whole form, form text and field text alike, and nothing is saved until you approve it:
- Choose the language to Translate from and the languages to Translate into (the form's languages are preselected), then click Next
- Choose what to translate and click Translate. Stop ends the run early
- Review every translation. Show only untranslated, Select all, and Select none help with long forms; badges mark text that is a Placeholder, Already translated, Built-in text, or on a Shared field used by other forms
- Save the approved translations
Field text lives on shared field records, so translating one form's fields adds that language for every form using them. Adding a language never changes or removes an existing translation.
A label you leave blank on the Labels tab, such as the Submit button or an error message, shows its built-in English text. The wizard translates that text too and marks it Built-in text. On a form whose default language is not English, it is also translated into the default language, and saved together with the other languages.
Translating Fields
You can also translate by hand. A field's Label, Description / Help Text, and Tooltip each have an editor with a value per language, in the field editor or by clicking the text on the builder canvas. Options are translated in the options editor (see Custom Structures), form-level text on the Labels tab, and value messages with their Translate button.
Translatable Text
- Field labels
- Field descriptions
- Field tooltips
- Select options
- Error messages, including file and verification errors
- Form title and subtitle
- Button labels, including the dialog's dismiss button
- Confirmation messages
- Value messages shown for selected options
- Page titles and descriptions, the review page title, and the Next, Back, step progress, and Edit labels
- The Reset Form button, when it is switched on
- Chat and survey messages, on Chat and Survey forms
Chat Forms
A chat form collects a visitor's details, then opens a Salesforce Messaging for In-App and Web conversation with an agent, passing the details along. Chat forms work on both Experience Cloud and Salesforce Sites. An Experience Cloud site needs a few extra settings, described under Chat on Experience Cloud.
When a visitor submits the form, QuikForms checks that an agent is available, optionally saves a record from the form, and opens the chat window on the same page. If no agent is available, the form follows its No Agents Fallback.
Before You Start
Set up Messaging for In-App and Web in Salesforce first. Salesforce's own setup guide covers it; in short, you need:
- A Messaging channel of type Messaging for In-App and Web, routed through Omni-Channel to a queue
- Agents who can take that work, with Omni-Channel presence statuses for the channel
- A QuikForms site to show the form: an Experience Cloud site or a Salesforce Site (see Publish Your Forms)
The Messaging Deployment
In Setup, open Embedded Service Deployments, click New Deployment, and choose Messaging for In-App and Web (Persistent conversations via an embedded window), then Web. Give it a name, choose your Messaging channel, and in Domain enter the domain of the site that shows the form, without https://:
- Experience Cloud: for example
acme.my.site.com, or your site's custom domain - Salesforce Sites: for example
acme.my.salesforce-sites.com
The chat window only opens on the domain the deployment names, and the domain cannot be changed after the deployment is created. A form uses one deployment, so to offer chat on two domains, create a deployment and a chat form for each.
Saving takes a few minutes while Salesforce creates the deployment's site; stay on the page until it finishes. Then click Publish on the deployment's page. No chat can start from a deployment until it is published, and a change to it takes effect when you publish again.
Configuring the Form
- Create a form. On the Settings tab under Basic Information, set Form Type to Chat
- Under Chat Configuration, choose your deployment in Messaging deployment. QuikForms fills in the org ID, site URL, and SCRT URL from it. If the deployment is not listed, paste its code snippet (from the deployment's page, Code Snippet) into Embedded Messaging Code Snippet instead
- Under Sites that can start chats, find the site that shows the form. A chat cannot start from an address that is not in your org's CORS allowlist, and you add it there yourself: click Show Me How next to the site, click Open CORS in Setup, click New, enter the site's address as the Origin URL Pattern exactly as shown, and save. Then click Check Again; it says the site can now start chats. Form preview in Salesforce is the builder's own preview, and only needs allowing if you test chat there
- Choose a No Agents Fallback:
- Show Message Only: the form shows that no agents are available and cannot be submitted
- Switch to Create Record: the form can still be submitted, and creates a record instead of starting a chat
- Optionally choose Agent statuses: the Omni-Channel statuses in which an agent counts as available. Leave it empty to count any agent whose current status is not an Away status. The check counts agents across the whole org, not only those in the channel's queue
- Optionally turn on Create Record Before Chat. The form then saves a record on its Form Object before the chat opens, and passes the record's ID to the chat as
RecordId - Optionally click Open Field Mapper under Chat Context Field Mapping to pass form values into the chat. Each Chat Variable must match a hidden pre-chat field your deployment defines (a custom parameter on the Messaging channel, added as a hidden field in the deployment's pre-chat settings). A value the deployment does not define is not passed on
- Save and publish the form, and share its link as for any form
The Labels tab's Chat Labels section holds the Chat Button Label, the No Agents Available Message, and the Chat Transition Message, in every language the form offers.
Chat on Experience Cloud
On an Experience Cloud site the chat window is started by a small QuikForms script in the site's head markup. In Experience Builder, for the site that shows the form:
- Open Settings → Security & Privacy and set the security level to Relaxed CSP: Permit Access to Inline Scripts and Allowed Hosts. Salesforce requires it for Messaging for In-App and Web on a site
- On the same page, under Trusted Sites for Scripts, click Add Trusted Site and add the deployment's SCRT URL, for example
https://acme.my.salesforce-scrt.com. The form's Chat Configuration shows it as SCRT URL once a deployment is chosen. If the deployment's Site URL is on a different host from your site, add it too - Open Settings → Advanced → Edit Head Markup and add this line, below anything already there:
Type
<script src="{ basePath }/sfsites/c/resource/quikforms__QuikFormsChatBridge"></script>{ basePath }exactly as shown; Experience Builder replaces it with the site's path. You do not need the deployment's own code snippet: the form sends the deployment details itself, so one site can show chat forms for different deployments - Save, then Publish the site
A Salesforce Site needs none of these steps.
Troubleshooting Chat
| What the visitor sees | Check |
|---|---|
| No agents are available, while agents are online | The form's Agent statuses: an agent counts only in a status listed there, or, when it is empty, in any status that is not an Away status |
| "Chat could not start" on an Experience Cloud site | The head markup line under Chat on Experience Cloud, and that the site was published after adding it. The QuikForms Error Manager records the reason |
| The form submits but no chat window opens | That the deployment is published, that its Domain is the domain of the page showing the form, and that the site is allowed under Sites that can start chats. On Experience Cloud, also the SCRT URL under Trusted Sites for Scripts |
| The agent does not see a form value | That the Chat Variable matches a hidden pre-chat field the deployment defines, and that the deployment was published after the field was added |
Survey Forms
A survey is a form sent as a personal link, usually about a record such as a Case. Each link carries a secure token, expires after a set number of days, and records one response.
Creating Surveys
First build the survey form:
- Create a form and, on the Settings tab under Basic Information, set Form Type to Survey. The Form Object is set to QuikForms' Survey object for you
- Under Survey Configuration, set:
- Survey Validity Days: how many days a survey link works after it is created (default 30, from Default Survey Validity (days) in the org-wide settings)
- Allow Multiple Completions: lets the same link be completed more than once
- On the Labels tab, under Survey Labels, set the Survey Expired Message and Survey Completed Message visitors see on a link that has expired or has already been used. The form's own confirmation message and error messages apply as on any form
- Publish the form, and make sure Public Site URL is set in the Setup Assistant: survey links are built from it
Then create survey links, one per recipient:
- From a record: QuikForms includes Create Survey for This Case, Create Survey for This Account, Create Survey for This Contact, Create Survey for This Lead, and Create Survey for This Opportunity actions. Add the one you need to the object's page layout. In the action, choose the form under Select Survey Form, optionally give a Survey Name (Optional), and click Generate Survey. Copy URL copies the link
- From a Flow: add the Create QuikForms Survey action. It takes a Form Definition ID and optionally a Parent Record ID and Survey Name, and returns the survey's URL, for example to send in an email
Survey Tokens
Survey tokens are cryptographically secure 32-character identifiers:
Example Token: 7a9f2b1c3d4e5f6a7b8c9d0e1f2a3b4cToken Features
- Unique per survey
- Time-limited (Survey Validity Days)
- One-time use (unless Allow Multiple Completions is on)
- Validated on every submission
- Stops working while the form is offline
Response Management
Each survey is a record of QuikForms' Survey object, with:
- Survey Name and Survey Token
- The parent record it is about, if any
- Whether it has been submitted, and the Submission Date
- Overall Satisfaction
- Issue Resolved
- Response Comments
Survey form fields map to these the same way other forms map to their object's fields. A form that has surveys cannot be deleted, because the responses stay linked to it; take it offline instead.
Error Management
Monitor and troubleshoot errors from the QuikForms Error Manager tab, which opens the Exception Logs page:
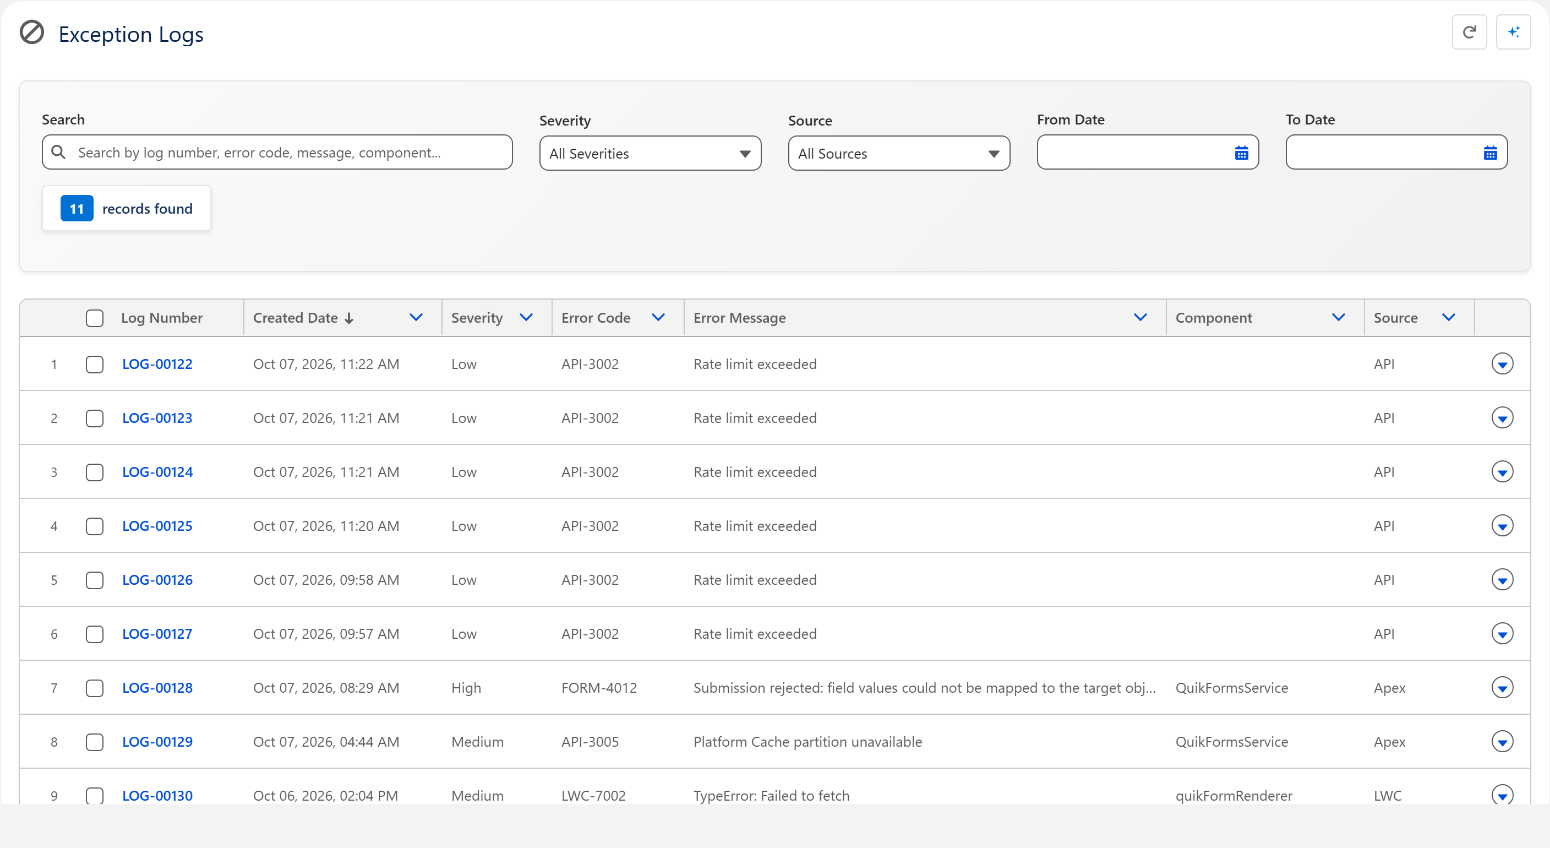
Exception Logs
QuikForms records errors from its server code, the admin screens, and the public forms. What is recorded depends on Exception Log Level in the org-wide settings: the default, Error, records Critical and High severity only. Logs are kept for 30 days by default (Exception Log Retention (days)). See Org-Wide Settings.
Table Columns
- Log Number
- Created Date
- Severity (Critical, High, Medium, Low, Info)
- Error Code, whose prefix says where it came from, for example APEX-, LWC-, API-, FORM- (a form's configuration), MDAPI- (setup changes made through the Metadata API, such as saving settings), or PLUGIN-
- Error Message
- Component (where the error occurred)
- Source (Apex, LWC, API)
Filtering Errors
Find specific errors quickly:
- Search: by log number, error code, message, or component
- Severity: Critical, High, Medium, Low, Info
- Source: Apex, LWC, API
- From Date and To Date
The header's Summarize (N) button has QuikForms AI digest the logs currently shown, up to 200. Delete (N) deletes the selected logs.
Error Details
Click a log's View Details action to see:
- Error Overview, and Explain with AI under AI Analysis
- Source Context and the Stack Trace
- Form Context: the form and record involved
- User Context: the visitor's browser and IP address, where recorded
- Request Context
- Governor Limits consumed
- Notes
Analytics Professional
On Standard: every form still counts lifetime views and submissions, shown with the conversion rate in the QuikForms Manager list. The builder's Analytics tab is not shown, the QuikForms Analytics Manager tab shows an upgrade message, and the dashboards described below (conversion over time, engagement, devices, browsers, referrers, completion time, per-field detail, and AI insights) are Professional.
QuikForms includes built-in analytics for how your forms are performing: views, submissions, conversion rates, and more, stored in Salesforce with no third-party analytics service.
Analytics Overview
Analytics can be accessed in two ways:
- QuikForms Analytics Manager: a tab showing analytics across all forms
- Per-form analytics: the Analytics tab in the Form Builder, for one form
Turning analytics on and off
Analytics Enabled under Setup Assistant → Settings → Features switches tracking on or off for the whole org.
On a form's Analytics tab, the Analytics Enabled switch turns tracking off for that form only. It is part of the form's version, so change it on a draft and it applies when you publish. Include field-level detail, shown while analytics is on, adds per-field counts; it applies to the form immediately, without a publish.
Analytics and your API allocation
On a Salesforce Sites form, recording a view costs one API call against your org's daily allocation. A completed form costs about three calls in total: loading the form, recording the view, and the submission itself. Turning analytics off for a form drops that to two.
On an Experience Cloud form, analytics costs nothing. That path uses no API calls at all, so tracking can stay on for every form.
As a guide, an Enterprise org with 25 licenses has around 125,000 API calls a day, which covers roughly 40,000 completed forms on the Salesforce Sites path. Turning analytics off makes a difference only for high-traffic Salesforce Sites forms in an org whose allocation is already tight.
What you lose by turning it off
Views, bounce rate, and the per-field funnel stop being recorded for that form. Submissions are still created as normal, and the records themselves are unaffected. Historical analytics already collected stay where they are.
Analytics Manager
The QuikForms Analytics Manager tab gives an overview of every form's performance:
Aggregate Metrics
| Metric | Description |
|---|---|
| Total Views | Total number of times all forms have been viewed |
| Submissions | Total number of successful form submissions |
| Conversion Rate | Percentage of views that resulted in a submission |
| Avg. Time to Complete | Average time from form load to submission |
Trend indicators show percentage changes compared to the previous period (for example, +12% views against the prior 30 days).
Per-Form Breakdown Table
The table lists each form with sortable columns:
| Column | Description |
|---|---|
| Form Name | Opens detailed analytics for that form |
| Form ID | Unique form identifier |
| Views | Total views for the selected date range |
| Submissions | Total submissions for the selected date range |
| Conv. Rate | Conversion rate (submissions / views) |
| Avg. Time | Average time to complete the form |
| Desktop | Number of desktop views |
| Mobile | Number of mobile views |
Date Range Filtering
The Date Range filter offers:
- Last 7 days
- Last 30 days (default)
- Last 90 days
- All time
Per-Form Analytics
Click a form name in the Analytics Manager, or open the Analytics tab in the Form Builder, to see one form's analytics. The tab has the same Date Range filter and a Refresh button.
Headline Metrics
- Total Views: number of times the form was loaded (with trend indicator)
- Unique Visitors: distinct visitors that day, counted once each however many times they view the form. QuikForms identifies them by a one-way hash of their IP address salted with the date, so it never stores an IP and cannot recognize the same person tomorrow. That makes the figure per day: a visitor who returns on Tuesday is a new unique visitor on Tuesday, and a multi-day total is the sum of each day. Visitors sharing an office connection can look like one person.
- Submissions: number of successful submissions (with trend indicator)
- Conversion Rate: percentage of views that resulted in submissions
- Avg. Time to Complete: average time from form load to submission. It is elapsed time, so a tab left open in the background counts too
Engagement
This section separates people who never touched the form from people who started and gave up:
- Started: sessions that interacted with at least one field, as a share of views
- Bounced: views that never interacted
- Abandoned: sessions that started but did not submit
- Completion Rate: submissions as a share of those who started. This judges the form itself, where the conversion rate also counts visitors who never engaged
Where people stop
With Include field-level detail on, a table lists each field with how many sessions Reached it, Left blank, hit Errors on it, and Quit here. Counts start when you switch it on and come only from real visits to the published form. Engagement and this table appear once there is data to show.
AI Insights
Analyze with AI gives a plain-language read on how the form is performing over the selected date range; Run again refreshes it. Changing the date range or refreshing clears the previous answer. The button appears when QuikForms AI is available to you.
Daily Trends
A bar chart shows daily views, unique visitors, and submissions over the selected date range. Hover over bars to see exact counts for each day. Days with no activity have no bar.
Device Breakdown
Views are broken down by device type:
- Desktop
- Mobile
- Tablet
Browser Breakdown
Submissions are counted by browser:
- Chrome
- Safari
- Firefox
- Edge
- Other
Top Referrers
See which websites are driving traffic to your forms, with visit counts per referring domain.
Metrics & Data
All analytics data is stored in your Salesforce org. No external analytics service or third-party script is involved. Analytics stores counts only: never what anyone typed, and never an IP address.
Privacy-Friendly
QuikForms analytics keeps its data within your Salesforce org. The one exception is Analyze with AI: when you click it, the form's configuration and aggregate counts are sent to Anthropic to write the summary. No submitted values or visitor details are included.
Best Practices
Form Design
- Keep forms short (5-10 fields maximum)
- Use clear, concise field labels
- Mark only essential fields as required
- Group related fields together
- Provide helpful descriptions for complex fields
Field Reusability
- Create fields in the QuikField Manager first
- Use consistent naming conventions
- Don't delete fields used in published forms
- Clone fields when you need similar variations
Version Control
- Always test with Preview before publishing
- Give each published version a meaningful version tag
- Publish as a Major version for significant changes and a Minor version for small ones; QuikForms numbers them for you
- Take a form offline rather than deleting it when you may need it, or its responses, again
Performance
- Publish high-traffic forms on Experience Cloud, which uses none of your org's API allocation
- Use field validation to catch errors early
- Allocate Platform Cache so rate limiting works
- Use analytics to monitor form performance and conversion rates
Security
- Always use HTTPS for form URLs
- Keep Cloudflare Turnstile enabled on public forms. Honeypot detection runs alongside it, on by default.
- List the domains your form pages are served from under Valid Referrers in Setup Assistant → Settings → Security, so requests sent from pages on other domains are refused
- If you embed forms in your website, allow only that website to frame them (see Embedding Forms)
- Keep Rate Limit (per minute) set (default 20)
- Review the QuikForms Error Manager regularly
- Don't expose sensitive data in hidden fields